It’s been decided. The first round of seed-starting 2008 starts today. I considered shooting a mini video how-to of this procedure to post here but decided against it because it is another miserably grey and sunless day in Toronto and video would require the additional hassle of setting up lights. And of course I would need to shower, dress, and “style” my hair. My friend Jen insists these extra steps are not required but I’m convinced that a video shot in my pj’s is a little more truthiness than I’m comfortable revealing to the world. Rest assured, dear reader, that despite the occasional slip into TMI territory you will never be asked to peer inside my fridge, or my bag.
And in truth a seed-starting video how-to is redundantly painful when I think about it. Certain aspects of seed-starting are certainly troubling, but the part that involves plopping some seed-starting mix in a container, adding some seeds, and covering the hole with more soil really is that easy. I’m going away for a long weekend soon, smack dab in the middle of a critical point in a young seedling’s life, so I’ll be starting this batch in my self-watering seed-starter — my neighbour has enough stress dealing with the cat and house plants, I don’t need to add Keeping Very Important and Very Fragile Seeds Alive to the list.
There are a million and one ways to approach just about any gardening procedure and everyone will tell you their way is THE RIGHT WAY when in fact there are lots of right ways. That is the first and most important lesson beginner gardeners should know if they want to save themselves a whole lot of future hair-pulling.
Below, in a nutshell, is how I get my seeds started:
- Assemble tools and ingredients including but not limited to: Seed-starting mix, empty containers or self-watering device, seeds, water. If your containers are previously used you’ll probably need to wash them in some hot soapy water. Add a few splashes of oxygenated bleach.
- Moisten a batch of seed-starting mix by dumping it in another container, adding in enough water to make the mix damp but not soaked.
- Loosely fill each container or chamber with the pre-moistened seed-starting mix and lightly press the soil to eliminate air pockets and bubbles. Another container of the same size works well and of course so do your fingers.
The goal here isn’t about seeking a perfectly level surface, reasonably level with suffice. The key is to try and leave a little space between the tamped soil surface and the top of the container/chamber so there is space to cover the seed/s later on. The only trick here is to make sure the amount of space left is relative to the depth each particular seed needs to be buried. Seed packets will tell you what’s what but a good general rule-of-thumb is to bury the seeds approximately as deep as they are in size. So following this theory a tiny seed like basil would need to be buried quite close to the surface while a pea or bean would need to be buried about a half-inch or so below the soil surface.
I prefer this method to making a hole because it allows me to space as many seeds as necessary. Of course making holes will work just fine too.
- Sow a seed or two or three in each container/chamber. I sow more than one to be sure at least one germinates but how many depends on the size of the container. You can always cut extras out later but you waste time trying again with seeds that don’t germinate. If you’re unsure about the shelf-life of a pack of seeds you can always try testing them out first.
- Cover the seeds with a layer of seed-starting mix. I’ve used vermiculite too but to be honest haven’t noticed a difference. Either works just fine. Remember that the amount of coverage required varies depending on the seed. Consult your seed package or use the general rule of thumb I mentioned above.
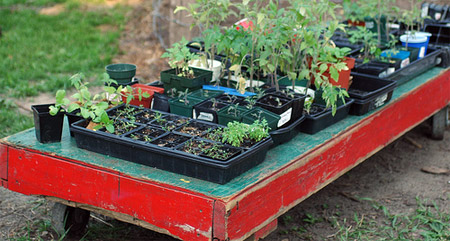
- Place your containers on a tray and water from the bottom (into the tray rather than the container). Remove any excess water that is still sitting in the tray 15 minutes later.
- Place your tray in a warm spot. It’s optional but I can’t say enough about a heating mat. They’re not cheap so I don’t recommend it if you’re not yet sure if seed-starting is your thing. However, a mat (sort of like a bottle warmer for plants) will provide constant heat at just the right temperature. At this stage in the game light isn’t an issue (for most seeds) but warmth is critical in aiding germination. Unfortunately the warmest spot isn’t always the most convenient — appliances make adequate but slightly dangerous make-shift heating mats!
- Tag or label each container. Do not delude yourself into thinking you will remember what you’ve started where. I’ve grown enough mystery plants to have developed a deep appreciation for labeling.
- Keep the soil damp like a sponge that has been wrung out but not soaking wet. Now relax and wait for the magic to happen.
Are you talking about heating mats as in the ones we put in our beds to stay warm? I’ve thought about that, but I always thought maybe it would be a little too warm. Do you just put your seeds on it and keep it on low? Or use some insulation between the two?
Robyn: Bed mats would definitely be too warm. These are mats made specifically for germinating plants. Here’s an example.
I found a 72 cell self-watering starter at Burpee.com for $19.95, seems similar to the one linked above but more cells.
Meg: Looks like a case of you get what you pay for. It’s hard to tell from the small picture but I get the impression that the cells are just like the flimsy disposable cell packs you can buy on-the-cheap. It doesn’t say how small the cells are but one thing I like about the regular-sized starter I own are the 2″ cells (The windowsill starter has smaller cells). I like the larger cells because it means I can go a bit longer before transplanting into individual containers.
And I can’t believe I am continuing to sell the starter I use but will add that it has a water gauge that tells you if you are running low. Very handy!
Weird! I did my seed planting last night *LOL*
I’m trying out that Seed Starter unit from Lee Valley, and using an Ott light that I had kicking around from an old set of projects – I gather it’s got some sort of wide-spectrum bulb or something. We’ll see how it goes.
what a glorious thing to announce. be fruitful and multiply. the Moon is full on the 21st.
Very true about getting what you pay for- the Lee Valley is certainly of better quality.
Burpee does have one for $9.95 (without those icky pellet-things) and shipping is a little less to CA at least, so if you have a lot of seeds to start and don’t mind the smaller size cells/absence of water gauge- it might be worth it just to have them all in one contraption. I use dixie cups and a plastic tray from a garden center recycling bin so I can’t speak from experience on this one, just sharing a possibility.
….oh, man, but I want to *know* magic is going to happen. I’m very, very nervous. They’re my first seeds ever.
Have you ever planted alpine strawberries? That’s what I’ve done, and I’ve heard they can be tricky.
I’ve only planted seeds inside once, and it failed miserably, so I know where you’re coming from Megan.
Megan- there is an awesome alpine strawberry post in the forum section, I copied the link below, great pictures.
Meg
i’ve got three of the smaller lee valley windowsill self-watering systems going right now. just 10 days into it, and i have very happy lettuce babies, some mint and dill poking out from the soil, and already had to transplant my radishes. it’s a great way to begin seed starting with no heat mat or artificial lights required. just a sunny window.
My babies have germinated and the little cotyledons are doing their thing right now. I’m figuring on getting the grow light going this weekend, but have already learned that Cosmos, tomatoes, lavender and petunias from the rare seed folks in Mansfield, Mo grow like they’ve been mainlining Miracle Gro. If I didn’t know for certain that they were heirloom and organic, I’d be certain they were juiced. Seriously- they’re enormous.
But I’m worried about my peppers. They still haven’t germinated. :::biting nails::::
Laura: Some peppers can take an awfully long time so try not to worry… bottom heat definitely helps.
I dont get much Sun because my window i use face`s East. so i start a bit early last week of Feb. everything is up about 1/2 in. Im trying bigger Cells and to get the roots deep i only fill the dirt up about a 1/4 full them fill the dirt to the top when the plants get bigger.
Mortgage Lifter, Stupice, Thessaloniki, Juanne Flamme, Red Pear, Black Price. round out this years Tomato`s. Some of the Tomato`s where saved from previous seasons and those Tomato`s seemed bigger after 2nd year from saving seeds from best plants.
it’s a good sign! i was planning to start some of my seeds this weekend. :)
The winner (i.e. first up) in our house is….Ruby Red Chard, just emerged this morning. Such happiness!
When people say they started seeds and “it was awful” or “I didn’t succeed at all” … what exactly happened?? I have started seeds for the first time this year and so far so good. I have good germination and things seem to be going all right … just curious what I should be on the look out for! Leggy seedlings? Good light source close to the seeds should prevent that right? Damping off? Not sure what that is – sounds like mass suicide of seedlings!
Damping Off and Leggy Seedlings are the two biggest problems. The keys to preventing both: good light, air circulation (people often forget this one. Don’t leave those plastic domes on once the seedlings emerge), and consistent but not too wet moisture. Sterile potting mix and clean containers helps too.
Just curious, when is a good time to take off the dome. Since I only planted 2 days ago, it’s not a pressing concern yet, but I’d like to plan ahead a little.
Matt: Remove the dome when the seedlings start to emerge from the soil. It’s really just there to keep the soil consistently moist while the seeds are germinating underneath the soil. If you feel you really need the added humidity and have a mix of plants with a varying germination rate you can leave it on a little longer but prop it up a little on one side to allow some air to enter.
Hmmm. Good point about the labels. I thought that I was being really organized a couple of weeks ago when I planted all of my leafy greens. Now something is sprouting, but I don’t know what! I also thought I was make really careful rows, but the sprouts are all over the place, oh well.
i live in north carolina, so i started my seeds a few weeks ago. most of them have germinated, but now i’m having the issue of some of them getting tall quickly. do i cut them back now? how do i do that?
Michele: What kind of plants are your growing?
So my question about seedlings is this: once they are starting to outgrow their little peat seed starters, but it’s not quite warm enough to move them outside- do I just move them into a larger container, and wait….or is there something in particular that I ought to do to prepare them for moving outside. (“Hardening off?” I’m not sure what that means yet. I’m new to this).
Jessica: If you started in peat pellets chances are very good that you will need to transplant them into a larger container long before transferring the plants outside. Hardening Off is the process of slowly transitioning your seedlings from their comfortable home indoors to the elements outside. You can read a bit about this process here.
Thanks Gayla! I knew the info was here somewhere!!!
do you have a problem with your cats and the seedling trays? my cat bothered all my house plants until i finally just gave them away.
hola…
i’ve been wanting to start a garden for a couple years now. this year i finally decided to do it, got my seeds, starter mix and peat pots. i sowed the seeds, but after reading your seed starting plan i realised that i should have started most of my seeds weeks ago to be ready to set them outside by the planting date. have i totally messed this round up, or can i go from here and still make something out of it? i’m new to the whole thing.
thanks,
sam.
Suzy: I’ve never heard of cats going after seed trays but cats are so individual…. My cat leaves most plants alone. Really the only plant she gives me trouble with is anything grassy… lemon grass is the worst. She will do anything to get at it.
Samatista: Where are you located and what plants? Plants will a really long season like tomatillos and tomatoes can be tricky because they often need as much as 80 days to make it to maturity. Some plants can definitely be started later…
It also depends on your growing conditions. For example my roof is very hot with very direct sun — tomatoes grow faster there then they do in my in-ground garden. So I know that I can start a bit later than the recommended start dates and once the heat turns up the plants will catch up and even surpass my in-ground plants.
thanks for replying gayla! well, i started tomatoes, broccoli and corn. (stating small since it’s my first year) i’m in ohio and our last frost is april 14th. the spot i’ve made for the garden will be sunny all day long just about, so that’s a plus. think these will be ok or should i start some later growers?
Just wondering, do you know any good sources for organic compost and/or manure in Toronto? I was looking at my plot the other day, and realized that it could use some extra pumping-up.
Matt: Foodshare sells compost during the growing season. They recently relocated to Bloor and Dufferin. I haven’t had much success finding manure. I’d recommend vermicompost instead. You can make your own or buy it from a number of local sources.
Samatistia: It’s worth a shot since your plants will only be off by a few weeks at most. Tomatoes are the longest growing of those and all they need is 60-80 days depending on the variety. I am guessing that if your growing season starts a month earlier than mine does in Toronto then it also extends a bit past ours too.
Plus those last frost dates can be a little off.
Also corn is usually direct sown into the ground directly when the soil is warmed up enough rather than started indoors since they don’t transplant well. And broccoli is less fickle than tomatoes.
Awesome, thanks for the info!
Just to follow up: the magic – it is happening. And it is just like that: magical.
My daughter (7 years old) and I planted lettuce, hanging tomatoes and bell peppers seeds last weekend using peat pellets. Yesterday when we came back home my daughter was screaming with joy….the lettuce is already sprouting.
I started my seeds a couple of weeks ago, and I’ve seen a lot of growth. The dirt is now starting to get moldy and the plants are suffering. Anybody have any idea what could be causing this?
I planted my seeds on St. Patricks Day after attending Seedy Saturday (california wonder (sweet)peppers, san marzano tomatoes, black brandywine tomatoes, eva purple ball tomatoes black cherry tomatoes, tomatillos, markemore cucumber, geovese basil, sugar baby watermelon) from the looks of it I should plant my lettuce, parsley, peas & kale now too) – any comments? It’s my first time – I am hoping to hear that I got an allotment plot here in Toronto this year (supposedly I’m 3rd on the list). I have a friend who will let me use his garden again though if I don’t & I have a roof top area I can use to plant in pots if necessary (I will do a little on the roof no matter).