
Garlic Shown: Stiff-neck which tends to be hardy and stores well over the long term.
Sitting down to write this, my first thoughts are to apologize for the slow down in updates recently. I consider writing to assure you that the slow down is merely a glitch in workload and I will not stop writing here during the winter season because gardening is a daily thing for me that does not stop it merely shifts with the seasons. While I’m at it I want to apologize for the header that still says “early Fall” when we all know it is proper Fall now. As I sit here a list of assorted lagging details run through my mind and I entertain the idea of apologizing for each one like something in the room that needs to be acknowledged before our relationship can move on. Or a clearing of my throat. “Ahem. Hi. Is this thing on?”
I wonder what it is about internet writing that brings that out? Is it the feeling of an informal and personable context? Is it the assumption that I am sitting down to speak directly to you and you back to me? When I sit down to write an article for a printed magazine I don’t think to begin with apologies and casual shout-outs. “So… Uh, sorry this is my first time writing for this magazine but you know how it goes, I had other stuff going on and insert excuse here. Before I kick this off I just want to say hey what’s up to so and so whom I met last week at such and such event.”
Okay, enough banter. Let’s talk about garlic.
I should preface these instructions by stating that I am not a garlic eater however I love to grow the plant. I think it is a beautiful plant worth growing regardless of personal taste, requires little effort to produce a good crop, is self-perpetuating (you can use this year’s harvest to produce next year’s crop) and it is especially useful as a pest repellent crop warding off insects like aphids and Japanese beetles. You can also crush garlic cloves in water and make an organic pest spray. Because garlic is easy to grow it also makes a good crop for trading with other food gardeners and friends.
Planting: Plant garlic in the early to late fall, allowing enough time for the cloves to establish and develop roots (about a month or so) before the soil freezes and winter sets in. If you’re in the northern hemisphere it is time to get off your butt and get that garlic in the ground, STAT. For some of you it may already be too late. I know there are some in zones that go into the teeny tiny numbers who are already experiencing snow and frozen ground. I put the bulk of my garlic in the ground at my community garden earlier last month but I still have a few miscellaneous bulbs that are planned for around the roses and wherever I can fit them into any of the 3 gardens. Unfortunately, I have been putting it off for far too long. Fortunately (or not), our late fall weather has been unseasonably mild buying me some unexpected extra time. And realistically, even if it is too late it’s certainly worth a shot. I have the bulbs, I’m not going to eat them so why not?
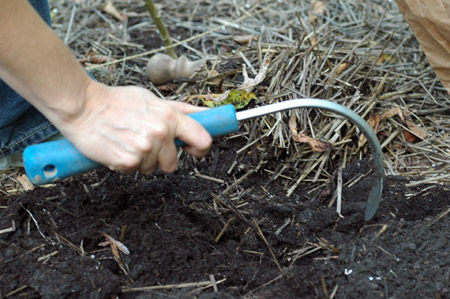
Garlic likes rich, well-draining soil. To begin, loosen the soil in the area you plan to plant and add in some compost to improve fertility. Thanks to my spouse Davin’s diligence in maintaining extra bins we have loads of rich compost this year. Thanks Davin!

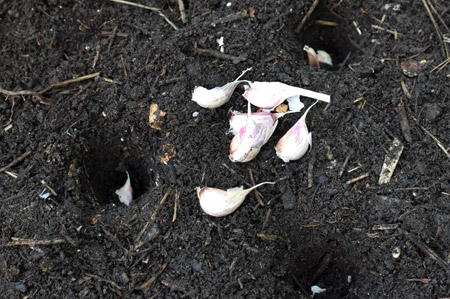
Breaking the bulbs up into individual cloves.
To avoid confusion: remember that a bulb is the entire package and is comprised of individual cloves. Before planting, carefully pry the bulb apart into cloves. Although hard, garlic bulbs are tender and should be handled carefully to prevent bruising.
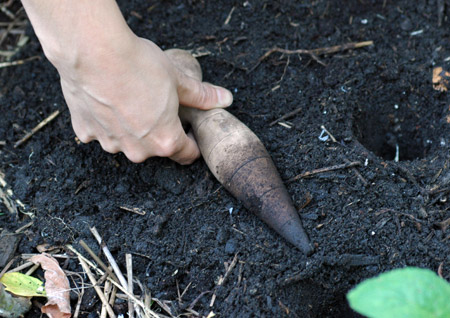
I use my dibbler (a planting tool used to make holes in the soil) to measure distance between holes. Each notch on the tool equals one inch. Yes, it turns out these things are actually useful!
Plant each clove about 2-3 inches deep and 4-6 inches apart. Make sure the pointy end is sticking up and the flat, root end down. All healthy, disease-free cloves can be used to grow new bulbs, but as common sense dictates good-sized cloves will grow into good-sized bulbs. Really large cloves are prone to spitting (forming two small plants). If space is an issue plant the best cloves first and save the rest for dinner.
You can see a single clove set into each hole.
Once planted and covered with soil, add a layer of straw or leaves as mulch to protect the bulbs over winter. Now go back inside and forget about it until springtime.
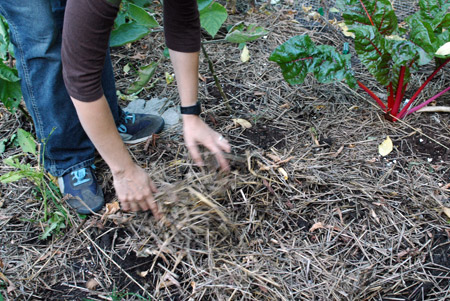
Here I am covering the area with a blanket of straw mulch.
Once the ground has thawed scratch a bit of compost into the soil around the bulbs. Water sparingly and only when the soil becomes very dry.
Harvest the flower buds (called ‘scapes’) as they appear by cutting them off at the stem with scissors or shears. Garlic scapes taste great fried and pruning them back will improve the size of your final bulbs at harvest time. But don’t cut them all back. Allow a few flowers to bloom for interest in the garden. Garlic flowers have a wonderful architectural look to them and will eventually produce a head of teeny tiny cloves called bulbils that can be eaten or planted out. Keep in mind that the teeny bulbils will produce small bulbs.
Garlic and scapes in early summer.
Harvest the entire bulb in late summer or early fall when the leaves start to turn yellow. Cure bulbs for long-term storage by leaving them out in the open air and sun until the skins are dry and the necks firm. This usually takes about two weeks. Don’t forget to set aside the largest cloves for replanting your next crop.
Container Growing: Garlic, like other members of the allium family can be grown in large containers that are a minimum of 24 inches deep.
I have been sitting on my ‘seeds of diversity’ garlic bounty for too long! I’m going to plant them tonight … this is the kick in the butt I needed (although I blame the weather here in T.O. for my procrastinating ways)
Would garlic grow ok in a (large) container? I want some for next year, but just moved into a new house and haven’t prepared the soil at all yet.
Wow. How nice that you made a post on this today. I was going to plant some cloves into the ground today. I’ve never planted garlic. However, after the worst drought in like 75+ years and as I was unlocking the door the go outside, it began to poor down. I got to plant some other things like collards and kale though. :O). I live in Georgia, USA and am a beginner. :o). Great web site. I’ve looked through the book in the library. It’s very nice.
I’m going to try it! I’ve been looking mournfully at my emptying containers and sad, sad garden, hoping to come up with -something- to plant to feed the urge!
You can make a nice pesto out of garlic scapes, too.
Melissa: Yes, you can absolutely grow garlic in a large container. If you’re in a cold climate like I am then I would suggest a container that can survive the winter outdoors. Also be sure to grow hardneck (aka stiffneck garlic) as opposed to softneck garlic. Softneck is what you see in most grocery stores and is suited to warmer climates. Hardnecks are the bulbs with a noticeable stalk at the top (see pic at top of page) and is hardy in cold climates.
I’ve grown garlic in planter boxes as well. It can be a nice choice over in-ground growing if soil is an issue.
JB: Being in Georgia you’ve got more time to get yours in the ground. You are wise to wait until after a hard rain. I plant lots of stuff during rainstorms but not the bulb plants.
Gayla, thanks for the great response you gave to Melissa. I definitely live in a cold climate (zone 2) and have never had luck with garlic. I’ll try growing it in a container!
I hope you don’t mind (won’t do it again), I’ve tagged you in the meme Nancy Bond passed along to me. :) I hope you’ll play along as I’m sure your answers would be interesting!
http://sandtoglass.blogspot.com/
I read this posting with great interest as I’ve just put 200 cloves of huge garlic, into the cold, cold ground using my freakin’ thumb! Hmmmm….Dibbler you say! Genius idea, one that I know will catch on with me, now that I’m rubbing my poor thumb with arnica to counteract the ache. Oh ya, it’s never too late to learn something new, and make gardening easier on the body. Thanks!
hey gayla congrats on the garlic. I am in san antonio, tx and I cannot believe it! I have tons and tons of tomatoes growin. I neglected my garden because my schedule has not allowed me to tend to it, but my rooster has been eating it and is very fat, and he keeps pests away (because he eats them too!) anyways, to my point. I have no idea why they are still growing. They died in the spring, but they are back with a vengance! I will be planting garlic soon too now that I have managed to get some time to get things in the ground. Last time I garden was a few months back, and it was always late at night. My neighbors were getting worried I was known as “the crazy garden lady” they were comparing me to a squirrel!
Yes the dibbler is indeed useful, great for making holes and measuring the distance between holes. You can also use the handle end of a trowel.
Living in central florida, the ground does not freeze here but once in a freakish blue moon. When would it be appropriate for me to plant garlic? Right now our daily highs are bouncing between 68 and 80 and the lows between 48 and 60.
Fidget: Your best bet is to try softneck varieties. This is tricky because some hardneck varieties will grow like a softneck in a warmer climate. The warmer and wetter your climate the less varieties available to you overall so I would recommend buying your stock from a local source since they will sell those best suited to your conditions.
From what I understand the suggested planting time for your climate is between November and January. You want to plant around the shortest days of the year.
thanks :) ive got a few weeks to wait then
I just heard about dibblers from this page and I’ve seen a few online, but I love the style of yours. where did you get it?????
Great site! Simple and very clear. The pictures are an added bonus, thank you for taking the time to upload them. I am going to do this! I love garlic, fresh is the best!
Keep up the good work.
what’s the difference between food garlic and seed garlic?
Emily: Technically nothing since garlic cloves are all clones and not actually ‘seeds.’ Seed garlic is just the name given to stock that is used for planting or commercially sold for planting. You can set aside the best bulbs from your first harvest and everyone subsequently to be used as seed. However, because garlic cloves are clones any disease or weaknesses will be passed between generations so for that reason starting off with good seed from a good source is wise. Some people go back to a new seed stock from a commercial grower after a few years if they see their stock start to do poorly and show disease.
I would not suggest supermarket garlic because 1. it is often softneck garlic and not suited to colder climates and 2. it is often in rough shape having spent time traveling far distances and sitting around on shelves.
A good seed grower will sell the good stuff and should get it to you in good shape.
thanks :) nice to know
sorry, I have another garlic question. I seem to be seeing “garlic and roses” in a few places, like people say to plant garlic near roses. Is that a coincidence that I have seen articles saying garlic is planted near roses or is it one of those plant relationships that strengthens both of the plants?
Emily: Yep, garlic is grown around roses as a pest preventative (particularly aphids and sometimes rodents like mice). Some say it makes the roses smell more fragrant but I can’t prove it. The Rugosa rose I grow is quite fragrant as-is.
I think that the benefit garlic receives from the roses might be in the quality of the soil in that people tend to pamper their roses with the nice, rich soil that garlic prefers.
I love this blog segment, it’s funny you posted this, I had recently divided up a garlic bulb and distributed the cloves with a nearly the same technique, but with the wonderful boost of visuals and instructions you gave, I have a little more confidence that my garlic growings will be a-okay. :) Btw…Gayla your sneakers are fantastic! You wouldn’t happen to mind if I asked you who designed them, would you?
Get better soon!
-Connie.
Connie: The shoes in the second-last picture are Pumas I bought several years ago called “Easy Rider.” They are comfy and were very affordable. The shoes in the top photo are a vintage pair of Adidas my brother picked up for me as a gift called “Seattle.” I took out the blue lacings that came with them and put in neon orange. Come to think of it he might be horrified to see me gardening in them!
I’m sure your garlic will be awesome!
My parents just gave me a little plot of my own in our backyard (!!!), and I look forward to using your site to help me in my gardening adventures. It is so beautifully presented, and the pictures are wonderful. I think it’s a bit late in the season for me to plant garlic, but maybe next year… sigh.