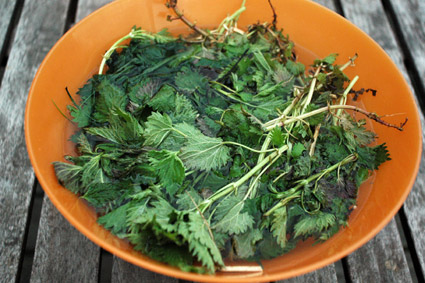
Stinging Nettle Tea

Photo by Gayla Trail  All Rights Reserved

In my world, foraging goes hand-in-hand with gardening. Maybe it’s because the compulsion to do both comes from the same place in my brain (a fascination with the natural world and an interest in knowing how things work). Or maybe it’s because I am thrifty and can’t stand the idea of so much good stuff going to waste. I’m able to save money and find a second use for discarded objects by foraging for bits and bobs for my garden. I forage for fertilizers too. And come to think about it, it might also be because I am interested in how wild foods that were once valued have been denigrated and demoted through history from nourishing wild food to a lowly, undesirable weed and I want to know for myself if they really deserve that indictment (two words: they don’t).

Whatever my reasons, I can’t imagine gardening without foraging and vice-versa.

This year I’m making more of an effort than usual to keep on top of foraging for early spring plants. There are several that are only edible within a short window of time and I don’t want to miss any of them, as is often the case. This year I got started harvesting stinging nettle (Urtica dioica) earlier than ever, since this is one herb that absolutely MUST be harvested in the early spring while the plants are still young and tender, and BEFORE flowers start to appear. I want to stress the importance of that fact since you can damage your kidneys consuming mature nettle parts.

Unfortunately my secret spot is no longer accessible. I am often able to harvest bags of the stuff, but this year could only get half of one bag. I had intended to glean enough for a big batch of nettle soup and a couple of bundles to dry for tea. I managed to get enough for tea, but do not have enough to make soup.

And now this is where I introduce a disclaimer about how I am not a medical professional and am not certified to dish out medical advice, yadda, yadda, yadda.

That said, nettle tea is said to be a mineral-rich tonic that can help allergy sufferers fight the symptoms of seasonal allergies. It’s the kind of remedy that has to build in your system — you can’t expect to drink one cup of tea and find yourself symptom free. This year I decided that I would get an early start on the tea and see what happens. So far so good, but in all honesty I haven’t been drinking it long enough to consider any positive effects.

Be advised that the “stinging” in stinging nettle is there for a reason. Merely brushing bare skin against the plant can hurt. A lot.

If you plan to go out picking nettles I suggest bringing along the following:

  • A pair of leather gloves. I use the cheap workman’s gloves you can buy for just a few dollars at the hardware store. They’re bulky but the sting can not penetrate. It can penetrate through thinner cotton gloves. Take my word for it.
  • A sharp pair of scissors or pruners for harvesting.
  • A bag or bags for collecting the plants.

Wear the gloves whenever you handle fresh nettle parts (leaves or stems). The sting only goes away once the plant has been dried or cooked. Don’t wash the leaves if you intend to dry them or they’ll go brown. I bundle mine up, wrap with twine, and hang in a dark, well-ventilated spot. I do wash the parts that are used in soup, but only if I intend to cook them up immediately upon returning home with a harvest.

You can find out more about stinging nettle and foraging in general under the newly added “Foraging” category.

Leave a comment

Experiments in Garlic Growing

Photo by Gayla Trail  All Rights Reserved

Before I begin, a confession: I did not plant garlic last fall. You are horrified. You are storming away from this website in horror.

Allow me to explain / make excuses. I managed to harvest my garlic early last fall and it was fantastic. The biggest and best garlic harvest we’ve ever had. I grew three varieties: ‘Music’, ‘Persian Star’, and ‘Siberian’. I think I liked the red skinned ‘Persian Star’ best. We had more garlic than we could eat in one season. I fully intended to separate the best and biggest cloves from the harvest to replant in the garden come October. But then October came. And there were deadlines. And I kept saying, I need to get that garlic in. But there was never enough time. I rarely left my desk. I barely had time to practice proper hygiene let alone plant garlic. And that is how the garlic did not get planted. Boo hoo.

Cut to early April when I spoke at the Seeds of Diversity 25th Anniversary. The event also hosted a number of seed and plant vendors, including a young farmer who raises and sells his own garlic. [Update: While cleaning my office, two months after the fact, I found the info sheet that came with the garlic. Wolf Grove Garlic, RR2, Almonte, Ontario] At the show, he was selling forced sprouted garlic that had already been hardened off (properly acclimated to the cold outdoors) and could be transplanted directly into the garden. I figured I might as well give it a try and bought eight plants in four different varieties: ‘Malpasse’, ‘Spanish Anatoli’, ‘French Red’, and a variety developed by his grandfather called, ‘Nono.’

Photo by Gayla Trail  All Rights Reserved

The roots were already beginning to push out through the bottom.

Photo by Gayla Trail  All Rights Reserved

I planted the garlic, pots and all, so that the garden soil was level with the top of the soil in the pots.

This should turn out to be a fun experiment. I’ve never done this before, having always planted my garlic in the fall. I had planned to plant some cloves in the early spring, as soon as the ground could be worked, in an attempt to get some garlic this year. By this late season method, the most I could hope for were tender garlic shoots and very immature little bulbs at best. I had absolutely no expectation of raising garlic to full maturity this year. But now I do. As long as the plants transplant well, I should have mature bulbs just a little bit later than usual in late summer/fall. I probably won’t have bulbs worth transplanting in the fall of October 2009, but I will have garlic. That’s nothing to scoff at.

Photo by Gayla Trail  All Rights Reserved

Accidental garlic.

However, I did notice something interesting while digging holes to plant the garlic pots in. It turns out that I missed a bulb when harvesting last fall and I’ve got garlic growing after-all. Based on where it is sprouting, the variety must be ‘Music’. Unfortunately, the sprouts are all clumped together, but I’m going to leave them as-is as another experiment in what happens when garlic is accidentally left in the ground to grow on its own.

Related:

Leave a comment

Together, Let’s Fight the Spread of Invasive Garlic Mustard (and Eat it Too)

Photo by Gayla Trail  All Rights Reserved

Another spring and a new crop of garlic mustard (Alliaria petiolata) is setting up camp for the season. We found a few small plants in the street garden cleanup last week and several at the community garden, many that were already much larger and lusher than any of the other cold hardy perennials growing there. And all of that despite the fact that this is my third year diligently removing every plant I find!

Now is the time to remove this highly invasive plant while it is still small and easy to pull. We learned the hard way last year that by May the roots are already enormous and deeply set. I took the above photo of an entire plant just a few days ago and the roots were already substantial.

Photo by Gayla Trail  All Rights Reserved
Here’s what the plant looks like right now. In the early stages it looks more like a common violet, but the distinctive garlic smell is unmistakable. Here are some photos of later stage plants for identification.

When removing the plant, be sure to pull up as much of the root system as possible. Pull when the soil is moist and loose and use a weeding tool if you have to. Destroy the plant, roots and all — do not put it into the compost bin! Or better yet, eat it. As I’ve mentioned before, that distinctive garlicy smell and flavor lends itself to all kinds of uses.

Free food!

Photo by Gayla Trail  All Rights Reserved
A jar of garlic mustard root “horseradish” that we made last spring.

My favorite way to eat it is lightly sautéed with some butter; however, we have tried making it into pesto by simply whizzing the leaves up in a food processor with a splash of olive oil and salt, and grating the roots into a horseradish substitute. The pesto is a bit bitter raw, I prefer it cooked. I’m thinking of using this year’s harvest to make “garlicy” mashed potatoes. The fake horseradish was okay, but since it took us several hours work washing and grating thin roots, I wouldn’t recommend it.

Leave a comment

Let’s Start a Community Garden

Photo by Gayla Trail  All Rights Reserved

I’ve been getting a lot of questions recently from people looking to start a community garden in their neighborhood. What I’ve included below is by no means a definitive guide, since there are lots of publications on community gardening out there now. However, these are the publications I have read and can wholeheartedly recommend. Feel free to add your own recommendations in the comments.

Leave a comment

Growing Food on a Windowsill – Microgreens

Photo by Gayla Trail  All Rights Reserved

Winter is slowly coming to an end around here and it is nearly time to start lettuce outdoors. Until then I’ve been growing and harvesting small batches of micro-sized greens on my windowsill as a way to keep some salad fixings coming through the darkest and longest days of winter.

Microgreens are tender and tangy lettuce and mustard greens that are chopped off young, usually when they are only an inch or so high at the most and barely a few weeks old. They’re smaller and younger than baby greens, which tend to be harvested later when the plants have grown a good three inches tall or more.

It is this short growth span that makes microgreens possible to produce on even the darkest windowsills through the dingiest months of the year. Even the most beginner seed starter can take this growing project on since the plants only need to be kept alive for a few weeks tops. Unlike growing full-sized plants, it’s not the end of the world if they grow a little leggy (thin and stretchy) in the process.

Lettuce Greens to Try

Give yourself a break on the first time out by growing readymade storebought mixes that come in mild or spicy combinations. Some companies sell mixes that include the word microgreen on the package but any salad or mesclun mix can be grown this way. I like Urban Harvest’s Oriental Salad Mix (has a slight kick) and the Mild Mix prepared by Botanical Interests. Once you’ve got a taste for what you like try making your own mixes. It’s more cost effective and you can tailor make mixes that leave out any greens that don’t suit your taste buds.

Spicy: Peppergrass cress, ‘Giant Red’ mustard, radish, arugula, daikon radish, and ‘Wrinkled Crinkled’ cress.

Mild and Tangy: Tatsoi, mizuna, kale, lettuce, miner’s lettuce, and minutina.

Photo by Gayla Trail  All Rights Reserved

How to Grow

They’re not particularly attractive, but I grow mine in recycled plastic takeaway containers and clamshell packaging. They’re always on hand and tend to be the right size for the windowsill. To prepare, simply punch 5 or 7 drainage holes (I always go for odd numbers) into the bottom of a 9″ x 7″ package using an awl, sharp pair of scissors, or knife. Fill ‘er up with well-moistened container mix, potting soil, or seed-starting mix to within an inch or so from the top. Evenly distribute a thin layer of seeds, sprinkling them over the soil surface with about 1/8″ to 1/4″ of space between them. Cover the seeds with a thin layer of soil, about 1/8″ deep. Set it in the sunniest window you’ve got with the lid of the clamshell placed underneath as a drip tray. Water in well to get them germinating.

Photo by Gayla Trail  All Rights Reserved

Sprouts at about the one week mark.

Keep the soil moist like a wrung-out sponge but not soaking wet. To avoid over-watering, dunk out any water that is still in the drip tray within an hour of watering. Microgreens can be harvested with a pair of scissors in 1 1/2-2 weeks depending on how large you want to grow them. I generally let mine grow until the moment their first set of “true leaves” begin to peek out. The first leaves you see are called “seed leaves” since they are actually a part of the seed. “True leaves” are the second set to appear and often look very different than the seed leaves.

Starting Again

Unfortunately, unlike when growing baby-sized and mature greens, you can not grow a second crop from the same stems. This is because the plants you are harvesting are essentially sprouts. Second crops grow from the upper part of the stem above the leaves, and these are harvested on the lower part of the stem below the leaves. The bad news is that you will have to start over with fresh seeds to produce another crop. The good news is that you can reuse the pot and soil if there were no problems with disease or pests on the first go-around.

To prepare for another crop, simply yank the remaining roots and stems out of the soil, toss them in the compost bin, and till the remaining soil with a fork. Sprinkle on a fresh layer of seeds, top it with a thin layer of soil and the process is begun anew.

Start a second crop of microgreens a few days to one week after the first set and you’ll have continuous crops ready for harvest through the winter.

Leave a comment