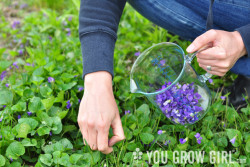
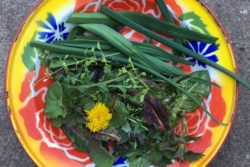
File Under: Weird Food

Earlier this year I discovered that the fruit from the Kousa Dogwood tree (Cornus kousa) are edible and I’ve been waiting until the end of summer to get a taste.

The first fruit on my friend Barry’s tree are starting to ripen and I managed, over the weekend, to collect a few from out of the clutches of the neighborhood squirrels. The fruit are ripe and optimal eating when they turn from green to bright red, and from hard to squishy. You should be able to squish the orange fruit from the centre easily. That happens to be just how I ate my bounty. The skin is unpleasant tasting. It looks like a lychee, with the texture of some of my favourite tropicals, sugar apple and sour sop. The insides are bright orange and soft, with a couple of hard pits. It tastes like papaya.

I’ve read that there is a lot of variation between trees and varieties, so if you have the chance, I’d suggest trying fruit from a sampling of trees. The fruit I ate are small but tasty. They are from a landscape tree that is bred for the flowers, not the fruit. But there are varieties with much larger fruit that are worth searching out if you’re looking for more than a light snack.

Related:

  • Paw Paw (Asimina triloba): A local and unusual tree fruit that is also coming into season.
  • Search this site by the tag, Weird Edibles to find out about other unusual vegetables, herbs, and fruit to grow or forage.
Leave a comment

Elderberries

Photo by Gayla Trail  All Rights Reserved

My friend Barry has an elderberry tree in his yard. Last summer he offered up the harvest in exchange for a sampling of the end product. I collected a lot of berries and was a bit unsure about what to do with them. Raw elderberries have a somewhat unpleasant scent and are not edible so it was difficult to commit to a usage without a clear understanding of what I was getting into.

Photo by Gayla Trail  All Rights Reserved

[Please note that while there are elderberries leaves shown in this photo, you should not eat them. They are poisonous!]

In the end, I made cordial. It was pretty good. The berries have an earthy taste. That’s all I can come up with as a descriptor. Earthy. Perhaps a bit pungent. It does taste like berries, I just can’t place a finger on which berries exactly. We dripped it on pancakes, poured a little onto granola and yogurt, and added it to sparkling water on occasion. Elderberries are very high in vitamin C and potassium. Many people use the cordial as a cold and flu elixir, instead of store-bought pharmaceutical cough remedies.

Photo by Gayla Trail  All Rights Reserved

This year I wanted to try using the flowers so I harvested about two thirds of the tree back in June, when the flowers were in season, and left the remainder to develop berries. I had enough to make two batches, so I tried two different methods. Unfortunately, I no longer remember the second (preferred) method nor can I recall what it was that I did or didn’t do that made it better. However, if you’re interested, the first, less preferred method came from the River Cottage Handbook No.2: Preserves, by Pam Corbin.

Photo by Gayla Trail  All Rights Reserved

Photo by Gayla Trail  All Rights Reserved

This year, with only 1/3 the harvest, I made a much smaller batch of cordial, which is fine by me because I think we prefer the elderflower flavor. I have no memory of how I made it last year, but this year I used this recipe from David Lebovitz’s website. Within the notes he makes a remark about straining the cordial a second time through a fine sieve. I’ve found that step to be essential and not overly attentive. Otherwise you end up with a very seedy, crunchy syrup. I didn’t have enough to can so I just sterilized two jars on a low heat in the oven before filling, gave one to Barry, and refrigerated the other.

I also made a quick, single jar batch of mixed berry jam last weekend (pictured). But that’s another story.

———

p.s. The site will be down this weekend while we switch over to a new design and work out all of the inevitable kinks. It’s going to be a bit manic, but I’m so excited! A big change has been a long time coming.

Leave a comment

First Lunch Courtesy of the Garden

Photo by Gayla Trail  All Rights Reserved

Recently, our meals have been peppered with ingredients gleaned from the gardens; however, today’s lunch is the first that is all garden grown.

Here’s the breakdown:

  • Chive Blossoms: A hardy perennial that has been growing for about a decade in a big container on the roof.
  • Lemon Balm: Eat the fresh leaves in the spring. This is a hardy perennial that self seeds all over the community garden.
  • Parsley: From the roof.
  • Pansy petals: Also from the roof.
  • Three types of lettuce: All of which self-seeded in various containers on the roof. I didn’t have to do a thing, although I did transplant a few to the community garden plot.
  • ‘Egyptian Walking Onion’: Just the greens.
  • Borage sprouts: I got this idea from Julianna, who brought a salad to our Saturday afternoon transplant trade/potluck that included borage from her garden. Borage self-seeds like nobody’s business and is coming up like mad right now. why not use the tender, fresh sprouts rather than tossing them in the compost? The first set of true leaves are prickly but the cotyledon leaves are smooth, with a fresh cucumbery taste.
  • Baby kale
  • Purple Mizuna: More on this soon. This is my new favourite edible!
  • Assorted mustard greens
  • Violet leaves and flowers: I have a small patch over at the community garden that is going to expand this year once I add the three additional varieties I have acquired this spring. Eat the young, new leaves and the flowers.
  • Bloody Dock: If you’d like to know more, I wrote an article on spring greens including bloody dock, for Garden Making magazine.

Photo by Gayla Trail  All Rights Reserved

For identification purposes, here’s what the borage seedlings look like. You can also identify them by their cucumber scent. The seedling in the top left corner is anise-hyssop. You can eat that too.

Leave a comment

Tripod and Pea Staking

Photo by Gayla Trail  All Rights Reserved

Staking is one of those topics that I was sadly unable to cover in the Grow Great Grub book due to space considerations. I covered it pretty thoroughly in You Grow Girl and I have to say that years later, and having experimented with other methods, my go-to cheap and cheerful method both in the ground and in containers is still the tripod. I find it exceptionally stable, especially on my roof where the spring and later fall winds can turn epic. It is also the cheapest and most accessible — most of us can find a source of long bamboo poles close to home for less than a dollar per pole. I have even found the occasional multi-pack at the dollar store for even less.

    The tripod method is simply 3 or 4, or sometimes more, bamboo poles (branches work well too) set into the ground at an equal distance around a plant or within a container and then pulled together at the top and held in place with a strong piece of string or wire.

1cg_aug25.jpg

I have fashioned riffs on the tripod for tall plants and climbers including tomatoes, sweet pea, morning glory, pole beans, peas, and cucumbers. I add string or other supports depending on the type of plant I am growing. In 2007 I grew 16 tomato plants and several cucumbers by building 4 sets of 4 tripod stakes supported by 4 poles around the top as cross beams. The added support proved to be unnecessary and drove us nuts all season long as we continuously (and painfully) ran into those stupid cross poles with our necks and heads. A single indeterminate (vining) tomato plant was supported by each pole and I strung mesh along one side that supported the cucumbers and gherkins. You can read more about that over here.

p.s. That’s the ‘Variegated’ tomato in the foreground/left. You can just make out the white splashes in this small photo.

I have even made smaller versions using shorter poles to prop up heavily laden bush beans.

But I didn’t intend to talk about tripod staking today so I’m not sure why I am preambling with that. Today’s topic is pea staking. Of all of the easy, or what I coined “artfully lazy” methods in You Grow Girl, I like pea staking best, most especially when it comes to propping up it’s namesake: peas.

    Pea staking is as simple as locating a bunch of twiggy branches (messy end growth with plenty of small twigs and branches) and then setting them into the soil with the solid end down. Next, plant your seeds in and around where you have set them into the soil and wait for the climbing plants to hitch on and eventually cover the branches in greenery.

This method works both in the ground and in pots. While bare, it appears orderly and decorative in pots, but can just look like a bunch of branches stuck in the ground if used in a large, empty garden bed.

Photo by Gayla Trail  All Rights Reserved

Last year, while walking home from the greenhouse, I came upon a large bundle of bright red, freshly cut dogwood branches. I had about a minute to brainstorm projects I could make with them and whether or not it seemed worth the effort to drag that bundle all the way home. In the end I decided that the dogwood was beautiful and chances were good that I might never come across sidewalk gold like that again. I walked a treacherous gauntlet back to my abode, and despite nearly poking the eyes out of hundreds of hipsters and small children, I was right, they were worth it. I haven’t seen a bundle of any branches, let alone dogwood branches that nice since.

I used all of the branches up; some in big pots as below and smaller branches in smaller pots. They made the pots look like something was happening while they were empty, and the red provided a beautiful contrast with pale green pea plants as they entwined themselves in the branches.

Here’s how it looked when the peas were fully mature. I believe this pea variety is ‘Carouby de Maussane.’

Photo by Gayla Trail  All Rights Reserved

Leave a comment

Special Order for Comfrey

Photo by Gayla Trail  All Rights Reserved

I recently wrote about the nutritional benefits of mulching and fertilizing with sea kelp. A commenter mentioned using comfrey, to which I replied that I am a big fan of comfrey as a fertilizer and would recommend it as a mulch, although I would suggest chopping it up or drying first since the leaves are very large and would form a dense mat when wet.

Comfrey is definitely worth growing as a ready made source of potassium, magnesium, and phosphorous if you’ve got the space. The trouble is it is awfully aggressive and will take over where ever you plant it, and then some. This is why I don’t grow it. I do however, have a secret location where I go every year to harvest a bit to make into liquid feed. That was until this year when I went to harvest from my secret stash and discovered it was no longer accessible. Noooooooo……

The tally so far: Summer is too wet and too cold, the tomato harvest is mostly crappy, and I can’t get any comfrey. The horrors.

But then, a happy turnaround. The other day I ran into a fellow forager/gardener. The subject of nettles came up which lead to comfrey and my recent loss. She mentioned that the farm she works for has a huge patch of comfrey that they use for making their own fertilizer. All I had to do was pay for the time it takes her to pick the leaves. Two days later I rode over to a local market and picked up a big box of comfrey. And while it did rain briefly, Monday was oppressively hot and humid so I stopped at the hardware store on the way home and bought a fan for my office window. Then I balanced a box of comfrey and a fan on top of my bike basket and walked it home because I am not adept enough to ride while balancing both, unlike those dudes you see balancing a twenty-four case of beer (we call it a two-four around these parts) on top of the turned around handlebars of their 10-speed with one hand and a six pack dangling from the other. While I’m on the subject of death-defying balancing feats on a bicycle, I once saw a guy balancing a massive rug on the handlebars while riding. On another occasion, I witnessed a guy with a TV, although that didn’t work out and the TV smashed onto the road.

And that, friends, is the story of the week summer finally arrived (we’ve had sun AND heat for days!), hope returned for our tomatoes, and I got my comfrey. Things are looking up.

Photo by Gayla Trail  All Rights Reserved
1. Chop up the comfrey with a pair of sheers or scissors and soak in a tub of water. I put a brick on top to hold it all underneath the liquid. 2. Let it sit for a day or two until it gets stinky and the leaves are broken down. 3. Strain off the leaves and put them in the compost bin or bury them in the garden. 4. Use the remaining liquid as a fertilizer by spraying on the leaves of your plants or pouring into the soil around the roots.

Leave a comment