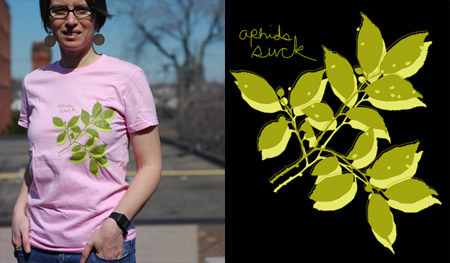
Gardening Mama

gardeningmama.jpg

I just heard through my partner Davin that Taito, makers of the game “Cooking Mama” are about to release a similar version of the game called “Gardening Mama“!

I rarely talk about products or get all covetous on this site however… Must. Have. Game.

I’ll admit that while I have no idea what this game is or how it will function, I am super excited about it. Gardening! As a delightfully pink animated character. It must be the snow that is currently falling from the sky and today’s all day five o’clock grayness talking because I don’t doubt that there will be aspects of this game that will be all wrong. And that wrongness will drive me crazy. I can already see it in the image (above) in which the hose is shooting water all over the plants. I spend so much time advising people against that behavior, enacting it via an animated game will be maddening.

And now I will go hang my head in shame while simultaneously scheming to get my hands on one.

If you want to see more there’s a bunch of Japanese screens over here.

Leave a comment

Miniature Ring Diorama

Photo by Gayla Trail  All Rights Reserved

Back when I wrote about the Gather, Circle Moss ring I mentioned thoughts about adding a little figurine, turning the ring into a miniature diorama on my finger. Well, what do you know, a package arrived in the mail yesterday from Amy, the ring’s creator, containing a tiny figurine of a man holding a hose and a patch of replacement moss. How awesome is that!

And I really needed that replacement too. I keep forgetting to remove the ring when I wash my hands, slowly wearing down the fake moss with every bathroom break. It was starting to look like a Texas lawn in July.

Leave a comment

Gather, Circle Moss Ring

Photo by Gayla Trail  All Rights Reserved

My pal Julie Jackson emailed me about the living jewelry created by Adorn Jewelry rightly thinking that they were perfect for gardeners. I ordered one almost immediately.

The rings come with fake moss embedded inside but you can put real moss in there if you prefer. The price has gone up a few bucks since I got mine but they’re still very affordable and well made. I don’t like to wear rings that can’t stand up to a bit of wear and tear and mine has survived through some recent rough and tumble. Although, somewhat ironically, I take it off in the garden. If rings aren’t your thing the designer also makes moss embedded pendants.

I’ve considered attaching some HO Scale miniatures to create a little diorama on my finger but I’m guessing that might make the ring almost unwearable through any activity beyond sitting very still with my hand set on a cushion. That would get old very quickly.

Photo by Gayla Trail  All Rights Reserved
And because I’m charmed by beautiful packaging check out the embossed thank you card that came with the ring.

Leave a comment

Weck: Fancy Pants Canning Jars

Photo by Gayla Trail  All Rights Reserved

Since the harvest season has got underway I’ve been doing quite a bit of canning. Canning in a small, claustrophobic apartment kitchen can get a little gnarly at times but I actually enjoy the process quite a bit. I feel like I’m getting one over The Man with every jar that seals. I always appreciate the effort come winter and have been surprised to find myself sitting on the floor on more than one occasion fondling the multi-colored jars of this and that tucked into the bottom shelves of a kitchen cupboard. As a kid I never could have dreamed it would come to this. That so many years later I would become someone who grows food AND puts food by. And who understands the meaning of the term. And uses it in sentences. I haven’t reached that hyper-perfectionist Fall Fair level yet but I can see giving it a go one day in the future. For the kicks!

My first forays into canning began about a decade or so ago with dill pickles and has since expanded into chutneys, jams, jellies, ketchup, salsa and just about anything that is safe to preserve in a regular boiling-water-bath canner. I don’t have a pressure canner but I’ve found myself day dreaming about getting one recently. I just don’t know where on earth I would put it! The big canning kettle is taking up enough space as it is.

This year I decided to splash out and buy some fancy canning jars. Why are all of the standard hardware store brands so UGLY? I especially dislike the cluster of fruit motif stuck on most small 1/4 pint jelly jars. You can cover the lids but those designs are debossed right into the glass. Any proper home canning jar will get the job done but aesthetically pleasing jars are just a little bit more satisfying to behold.

And so I looked around for the prettiest jars I could find, settling on a couple of boxes of expensive but gorgeous German made Weck jars. And they are gorgeous. But boy are they hard to come by. I was only able to find them online at Lehman’s, a store that sells all sorts of incredible old fashioned gadgetry. The catalogue is really fun to browse. Just yesterday I found myself getting excited about a bottle capper even though I don’t drink soda. It caps bottles! Imagine that.

Anyways, back to the Weck jars. The frugal in me refused to chance expensive shipping rates and so I tried looking around locally for a time instead. Unfortunately I couldn’t find anything in the city but when I went back to place an order canning season was already in full swing and they had sold out of some of the sizes and shapes I had hoped for. Lesson #1: Get your canning supplies WAY before canning season starts. Every year I say I will do this and then every year I underestimate how much I will need when the time comes which inevitably leads me to run out to my local hardware store where they have jacked up the rates preying on desperate canners and where the selection is down to the tackiest jar designs. Lord I am picky.

In the end I managed to purchase 4- 1 litre deco jars and 4- 1/2 litre tulip jars. I really wanted the petite jars for my jellies but only now realize that Lehman’s had them in stock but I overlooked it on the site. Dang it!

Photo by Gayla Trail  All Rights Reserved

My jars arrived yesterday afternoon. They really are beautiful. My first thought was to determine what was good enough for them. They’re so special and I only have a few. I wanted my inaugural canning session with them to be something special that will be best suited to the shape and size. The goal of canning couldn’t be more practical yet I’ve gone and shifted it into the realm of vanity making what goes in the jars less important than what looks GOOD in the jars. That’s one step closer to anal retentive Fall Fair ribbon winner.

I eventually decided to try canning up another batch of heirloom tomatoes in the larger 1 litre jar. I figured that the rich color and simple pear shape of ‘Japanese Black Trifele’ Tomato would be beautiful through the glass, matching the curves of the jar. I also thought it best to do my trial run with something I’ve got some experience with so I can make comparisons. I have some fidgety old blue glass Masons that I’ve been using for years but the Weck system is still a bit different. There is no screw lid. The entire jar is glass, including the lid. It is sealed with a rubber gasket which is held in place with two metal clips throughout the heat processing steps. The clips are then removed once a vacuum seal has been created inside the jar, leaving you with a very sleek and simple shape devoid of any metal that can potentially rust on the shelf.

The canning procedure wasn’t unlike canning with old glass Mason jars but it was a bit trickier. I found the shape of the jars and the lids harder to pick up with my standard jar lifting equipment. The jar mouths are a lot wider, which is great for cleanly getting food into the jar but not so great for lifting. The deco shaped jar was especially difficult because it did not have a real lip for the jar lifter to grab onto. The jars did not fit into my standard size rack so there was a lot of worried fumbling with jar lifters and tongs getting the jars into and out of the hot water bath. Like the vintage glass Mason jars I found it difficult to determine if a proper seal has been achieved. With no two part metal system to make that familiar POP, you can only really go on intuition, the position of the rubber lip (which should face down) and the strength of the lid once the clips are removed.

For those reasons I would not suggest these jars for beginners but I think the smaller petite jars would be easier to manage. Still, if you’re new to canning and are nervous about safety I would recommend sticking to the metal lid jars. And if you’re an intermediate or advanced canner the only other issue is the prohibitively expensive cost. I figure I will have to can with these every year for the rest of my life to get real value from them. Canning isn’t just about saving money but that’s certainly a pretty big factor and at over $6.00 a jar plus shipping these are not what I would consider a frugal or thrifty choice. They would make nice gifts although I have to say I think I will be saving these for myself.

What foods are you putting up this year?

Leave a comment

Troy-Bilt Pony Garden Tiller

Photo by Gayla Trail  All Rights Reserved

When Troy-Bilt, makers of large lawn and garden power machines, contacted me about reviewing a product I was a little hesitant. Actually I was a lot hesitant. I said no at first and then mulled it over for about a month before deciding to give it a try. First, let me explain.

My first few experiences in creating an in-ground garden involved a lot of digging. Having nothing else available, I grabbed a large shovel and I dug. And I dug and dug and dug. Anyone who has ever used their own two hands to dig up a bed knows what back-breaking work it can be. Not a whole lot of fun. Over time, the more I learned about gardening the more I realized that all that digging might have been a little unnecessary, especially for a small-scale gardener such as myself; harmful even. Here’s why:

Tilling, digging, and double-digging disrupts the soil. And soil is complicated really, much more complicated then we give it credit for. The soil is alive (yes even the crappy stuff) with all sorts of important organisms and minerals. A relationship exists between the elements that live and thrive within the layers that sit between the soil surface and the ones below. When we dig, we shake those layers all over the place, messing things up good. We also bring weed seeds up to the surface giving them ample opportunity to germinate and subsequently drive us nuts.

I’ve given up digging in the last few years. I dig holes when I need to put in plants. But for the most part I have decided to leave the soil be, adding compost and amenders to the surface with a little “scratching” but no additional digging required. I still can’t say whether or not double digging would have made things worse but I can see that NOT digging has been positive for both the garden and me. I am certainly glad to have that painful nonsense behind me.

So why did I decide to try out a tiller? For a couple of reasons, the first being that the no-dig no-till method is one theoretical approach to gardening but certainly not the only one out there. It’s the one I have chosen for me, but I’m not about to stick my nose up at the diggers of the world or stuff the no-till method down everyone’s throats as the tried and true way forsaking all others. The End. While I do not have any use for a tiller and have no plans to use one in my personal gardening experience anytime soon, if ever, I figured it would be worth it to at least see what all the fuss is about. I have absolutely no prior experience with a tiller. I have never seen nor touched a tiller either in use or stationery. I also realize that my no-till policy is a little biased. It’s easy to shun the use of a large machine when you’re gardening in a small space or have lots of people-powered help to get a garden going.

Beyond the soil my other concern about using a tiller is in the environmental impact associated with adding a gas-powered machine to the gardening process. What has always been human-powered labour in my experience would be easily replaced with a machine. But that ease comes with an economic and environmental price. Since they aren’t making solar-powered tillers (as far as I know) the “greenest” option was an electric machine. Troy-Bilt makes an electric cultivator but it is not meant for digging compacted ground and it isn’t even really a plausible option in an urban environment where a power source is rarely available. I knew I would be testing this machine in a public park or site without electricity or a plug-in point. We had to go with gas powered. I expressed these concerns to Michelle at Troy-Bilt who looked into sending me the most efficient model they had, a 4-cycle machine called the Pony Rear-Tine Rototiller.

And so the tiller arrived on my doorstep one afternoon. Or more accurately, a 200 lb machine set on a skid that I was not prepared for was set down on the sidewalk in front of my building one afternoon. Here’s what it looked like:

Photo by Gayla Trail  All Rights Reserved

I don’t have a garage and I live in a neighbourhood where things that are not bolted down disappear, possibly even 200 lb machines. Since I obviously have no need for, or space to house a 200 lb machine I had decided to donate the tiller to Food Share. Food Share is an organization dedicated to helping make good food accessible throughout the City of Toronto. They are also the home of the Toronto Community Garden Network, helping people get community gardens started in the city. I figured if any urban organization could actually use a tiller they’d be it. Turns out they didn’t have one. Thankfully they were able to dispatch a crew to pick up the machine and the crisis was averted.

Next came putting the machine together and trying it out. Ravenna at Food Share had arranged to try the machine on the grounds of the newish location of The Daily Bread Food Bank. They had recently moved just outside the city into the suburbs where there was some surrounding land available for growing food. A garden had already been started but there was still a large patch of very hard, very compact soil sprouting some very tough, hardcore weeds. I had decided that if I was going to try this thing I was going to really put it to the test. What would be the point in using a machine that comes with some negatives if it’s just going to do what a human can do with a little (or a lot) muscle power? One of the negatives of a tiller is that all that weight can compact the ground but in a situation like this I doubted that the tiller could cause anymore damage. I was actually more concerned for the machine then the soil!

Photo by Gayla Trail  All Rights Reserved

Putting the machine together took a bit longer than we anticipated, about 2 hours in all. Mind you neither of us had any experience with a tiller. I’m pretty good when it comes to reading instructions and assembling complicated items. In fact one of my early jobs as a graphic designer was to illustrate and design furniture assembly instructions! Despite that confidence we were still a bit nervous about screwing things up and so we both read and reread the instructions a few times over. Some aspects didn’t make a lot of sense or assumed some measure of prior experience. Some parts had to be removed and put back on a few times before we felt confident that everything was safely attached and in its rightful place. Getting the machine on and off of the truck was a bit tricky but we managed to pull it off with a rigged up “ramp” and some help from Food Share’s compost and soil guy (who for the record did not approve of the machine) and a volunteer dude at the food bank. I’m not so sure these sorts of machines are meant to be lugged around from site-to-site but we managed okay and the machine arrived with nary a problem.

On site, it took us a good 15 minutes of reading and rereading the instructions to be sure we had the starting and stopping procedures understood and memorized before gaining the confidence to start it up. Neither of us wanted to find ourselves in a Maximum Overdrive situation with a 200 lb machine running wild with neither of us able to shut the thing off. We’d also gained ourselves a small audience during the course of setting up and didn’t want to suffer any embarrassing situations that might result in having someone step in to help. We’d got this far. We were going to carry this through to the end on our own thank-you-very-much.

troy-bilt1.jpg

Once started, the machine cut through the tough-as-nails weeds, the hard compacted soil, and a shocking assortment of rocks quite easily. I shot some video footage of the machine in use but am hesitant to add it here due to the myriad of safety violations seen, from a lack of eye ear, and hand protection to the canvas sneakers worn by Ravenna. I know. I know. I only wore rubber boots that could be torn through just as easily but the last pair of safety boots I owned were more about cheap fashion than actual safety. Rubber boots were the “safest” option in my closet. For a big-ass machine The Pony was as loud and obnoxious as could be expected and as fun to use too. I’m not going to lie, power tools are fun! It did everything it was meant to do leaving lines of cultivated soil in its path as easily as you’d imagine a 200 lb machine of rotating steel tines should.

Photo by Gayla Trail  All Rights Reserved

And that’s basically where my review ends. It’s a big, burly, intimidating machine but it moves across the ground, chopping through everything beneath it smoothly and easily. Is it better at digging up tough soil then my two arms and a shovel? Hell yes. And once you get the hang of it it’s pretty painless too. Have I changed my mind about tilling versus no-tilling? Not at all. Experiencing the ease of a tiller has not changed my belief that disrupting the soil as little as possible is still the better way to go.

Leave a comment