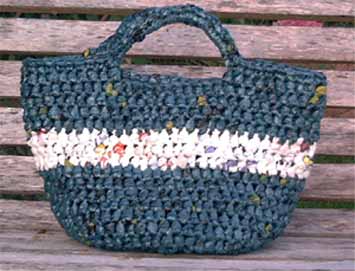
Gift It: Homegrown Herbal Bouquet

Photo by Gayla Trail  All Rights Reserved

I was invited to an apartment warming at my brother’s newish place the other night and since I had already treated him to a whole new garden, hereby known as “The Gift That Covers Me Off for Gift Giving Until 2010,” I decided I wanted to bring something but that that something should be simple and not cost money. The great thing about gardening, beyond the thousands of other more important reasons, is that there is always something available last-minute to gift to friends. I can just step outside and find homegrown edibles or flowers in a pinch that just about anyone will appreciate.

After all, who doesn’t like homegrown food or flowers? Granted, I’m sure if we looked hard enough we could find one or two out there in America but still…

As I was saying, a gift was in order. A gift that says, “Congratulations on your new apartment! Here’s something nice and useful to commemorate a meaningful life step but, you know, you’re my brother and dude, until I get a higher paying job or miraculously unearth a winning scratch ticket buried in the street garden… enjoy some quality homegrown herbs and edible delights.” Of course, I’m saying that cynically because in truth a winning scratch ticket would not change my desire to share the homegrown goodness. I’d just wrap it all in fresh, crisp hundred dollar bills.

And that is what I did (minus the cash money). My brother has been speaking highly of his new herb garden and all of the delicious herbed omelets he has been enjoying however I knew his plants were still small and were probably strained by enthusiastic and vigorous picking. My plants on the other hand are all well-established. I am actually over-run this year with sage, oregano and marjoram. I have been making herbal bouquets for myself for some time now and it only made sense to harvest a selection of yummy herbs, tie it up like a floral bouquet and give it as a gift. Flowers are nice but this bouquet keeps on giving. What’s more my bouquet was literally free since the butcher paper and twine was recycled from the packaging used to wrap flowers bought at the market. Yes, I have become my grandmother, holding onto every last scrap of packaging in hope of a possible future use.

Photo by Gayla Trail  All Rights Reserved

The bouquet I made for my brother is not the one depicted. That one included garlic scapes I had picked just that day, as well as a selection of assorted thyme varieties and large sprigs of fresh rosemary. The gift was a surprise hit with party goers wondering about that twisted oddity (garlic scapes) poking out of the bundle. I’m sure if my bouquet had included homegrown herbs of another sort I would have made a lot of new friends fast… however it did not and the love fest lasted a total of 10 minutes.

If you make your own, choose whatever you’ve got on hand or try for herbs that compliment one another. Help the recipient unwrap the package as soon as possible and get the herbs into water so that anything that has wilted can be revived. This is also your chance to talk about the herbs so your friend knows a garlic scape from a frightening alien life form and how they can use them in their next meal.

Leave a comment

Making More Mint

Photo by Gayla Trail  All Rights Reserved

Mint has got to be one of the easiest plants to grow. Just plop it into some reasonably rich soil in a reasonably sunny spot and watch it take over. Evidence of its opportunistic habit probably lives in your garden right now. It certainly does in mine. The ‘Chocolate Mint’ I attempted to reign in by planting in a pot last year has busted loose spreading into the soil outside my community garden plot and into the plot next to it. Thankfully my neighbor doesn’t mind the invading plant and I am not short on friends willing to take fresh ‘Chocolate Mint’ off my hands. Everybody wins.

So while making even more mint may seem a bit ridiculous, I’ve got a project on the go that requires mint and lots of it. I could go out to the store and buy a couple of ready-to-go seedlings but since the timing isn’t critical I figured I’d save some money and make my own using the five or so varieties living at my community garden plot.

The process is easy. Simply cut a few stems about 4 or 5 inches long just below a node (the juncture on the stem where leaves are attached). Pluck off one or two sets of leaves, stick the stems in a small cup or jar of water and wait.

That’s it.

Most mint varieties will produce roots by this method in no time. Yes, you can go the soil route, rooting cuttings directly into potting soil or a vermiculite/perlite mix instead of water. Some say this is the best method for the health of the plants and while I would agree when it comes to most other plants, I couldn’t be bothered with the added hassle when reproducing easy-rooting plants like mint or basil.

Once roots have formed, pot up or plant the new plants in-ground and you’re done. You can add a little vermicompost to the hole if you want and of course water them in well to get things going.

Leave a comment

Project The Best and Most Ass Kicking the Roof Garden Has Ever Been, EVER 2008

Photo by Gayla Trail  All Rights Reserved

While the street garden and the community garden plot are both merrily on their way the roof is a disaster. I started an assortment of edibles a while back amidst the chaos with the intent of organizing it, and then didn’t. When the local television stations starting calling about coming to shoot the garden for various growing season has begun segments I knew I did not want to find myself profusely apologizing for the lackluster show like I did last year.

“Hello. Welcome to my assortment of random empty containers. Please avoid pointing your camera in this direction, and that one, and while you’re at it you might want to crop out that pile of junk to your left.”

That’s the problem with a small space, there are no hidden spots to tuck away and hide the mess. Just everything out on display all the time. And so Project The Best and Most Ass Kicking the Roof Garden Has Ever Been, EVER 2008 was launched this afternoon and let me just say, it really is going to kick even harder than ever this year! Or something.

Photo by Gayla Trail  All Rights Reserved

On our way back from lunch I had the sudden impulse to transform an old metal frame into a chalkboard. We stopped at the local art store and picked up some Masonite. As soon as we got back Davin got on the job, transforming what was once an over-the-top framed 3-D hologram of Jesus that I had garbage-picked on a night stroll years back into a place for us to draw pictures. The drawing you see in the photograph is tame, embarrassingly quaint really in comparison to some of the images that first graced the board. I wish I had photographed those, although I am sure there will be plenty more like them in the future.

The project started out on a whim but once it was done we all agree that a place to draw and doodle outside is one of the best non-plant additions to the roof garden ever.

Leave a comment

Early Days at the Community Garden Plot

Photo by Gayla Trail  All Rights Reserved

Last fall I decided to participate in a national growing experiment called, The Great Canadian Garlic Collection, wherein hundreds, possibly thousands of gardening nerds are growing garlic, recording their results, and then pooling the data so we can all find out which varieties grow best under varying conditions. Believe me when I say that it is all VERY important work and I have taken my role as a participant very seriously. In fact I am taking it all so seriously that it has forced me to change my evil, too-open-to-suggestion-and-last-minute-changes ways by making a garden plan.

Last fall, when the garlic arrived in the mail, I knew I would not be able to do what I usually do which is just stick it wherever it will grow and forget about it until spring. I had to keep track of the garlic, the varieties I am growing, and then record my observations over the span of two years. For the first time ever I needed a serious plan. A plan that can’t be changed on a whim. A plan committed to paper.

And so I decided to make an experiment out of this experiment. I decided to try growing a slightly more formal garden at my community plot than is my way. My way is generally one based on informal companion planting. I grow plants in groupings that work, share, look gorgeous, and love together but I don’t get hung up on formally arranging things. I enjoy a bit of organization and try to keep chaos at bay in other areas of my life, but since the gardens aren’t so much my spaces anymore as they are work spaces, I try to leave a little space for serendipity to take hold. I do not use rulers or string. I do not mark space. I do not make a design on paper that can then be implemented in the earth.

But like I said all of that had to change with the introduction of the very important garlic. And so I set about making a plan last fall. I came up with a design and I set to blocking off the garden using sticks and string as markers. I planted the garlic, recorded its locations, drew in the herbs and perennials, finishing off with carefully marked blobs for spring plantings.

Photo by Gayla Trail  All Rights Reserved

And then in a telling Freudian slip, at the very moment I needed to place my early spring seed orders, I lost the plan. My subconscious did not want to be told it can only grow 4 tomato varieties. My subconscious was gonna grow those ‘Chocolate Cherry’ sunflowers formal plan be damned! I searched high and low but it was gone for good. I went ahead and ordered the seeds without the plan.

In the end it wasn’t a big deal, although as always I have far more seeds than I can grow. The overall layout was still marked off with string at the garden. Garlic sprouts have emerged from the soil with accompanying tags indicating the varieties. The perennials are marking their space, leaving me with empty pockets to fill with the seedlings I started under lights a month or so ago.

Photo by Gayla Trail  All Rights Reserved

And despite the formality there is still plenty of space for serendipity and last minute inspiration. When I went to do clean up on the garden last week I had the impulse to build a sculptural trellis to grow peas and beans on. I am overstocked on attractive pea varieties and thought it would be nice to grow them in the community plot this year. The community garden is surrounded by weed trees that require aggressive pruning every year less we lose sunlight to the garden entirely. I used some of those prunings to build a gnarly tripod trellis, reinforcing it with woven branches at the base. I’m rather fond of it. It is going to look gorgeous covered in peas, if the groundhog doesn’t get to them first!

Photo by Gayla Trail  All Rights Reserved

Leave a comment

Thrifty Ugly Bucket Camo

Photo by Gayla Trail  All Rights Reserved

The discussion around inexpensive containers for indeterminate tomato plants in a recent post has brought up a good point regarding how to conceal the clinical blandness of food industry buckets. The conversation in that post reminded me of a brilliant camouflage technique I discovered on a Saturday walk through my own neighbourhood a few years ago. I have shown this image during several presentations yet it did not occur to me to share it here. I’m not sure who the gardener/designer is although I’m fairly certain it is connected to the small restaurant that is located at this intersection. Whomever they are, what they have done to transform this corner with very little money is brilliant. The tomato plants seen in the foreground are growing in your average industrial food industry bucket but has been concealed using cheap bamboo blinds.

Photo by Gayla Trail  All Rights Reserved

Putting something like this together is incredibly easy and very nearly free. The blinds are cut to size, wrapped around the container, and secured in place by wrapping string around everything and tying a knot. Try securing with wire first and then covering it up with string if you’re concerned the twine won’t hold on its own. Jute is a very affordable but weak string. It can be replaced with a stronger twine made of cotton or sisal. All kinds of decorative options are available in abundance in the curbside economy. Replace bamboo curtains with wood curtains, grass beach mats or any combination of discarded natural fibre rugs, mats, or blinds.

These materials will probably only last a year outdoors but at least you have given them another year of life out of the landfill. By the end of the year they may even be weathered enough to break into bits and put into the compost bin.

Photo by Gayla Trail  All Rights Reserved

Another trick I employ when I can’t find anything to disguise ugly containers is to surround them with prettier pots. Organize larger, utilitarian buckets and garbage bins at the back of the arrangement, placing smaller, decorative pots with attractive plantings of pretty flowers and brightly coloured heirloom veggies in front. If the smaller pots are too short raise them up using larger decorative pots turned upside down as props. Make shelves out of bricks and discarded pieces of wood and then disguise that layer behind a lower tier comprised of smaller pots that sit on the ground. This tactic can be a little bit labour-intensive over the course of a growing season since it requires rearranging as the plants expand and grow. But containers generally require rearrangement for this reason regardless.

The fluidity and possibility for change that comes with container gardening is a positive that big money designers use to their advantage. While most of us can’t afford to swap out expensive containers for new expensive containers on a whim, with a little ingenuity and creativity any of us can fancify ugly buckets or simply rearrange pots to improve the overall look of our container gardeners.

Leave a comment