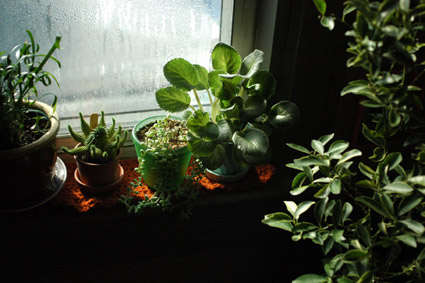
Somewhat Creepy Baby Doll Buggy with Mint

Photo by Davin Risk All Rights Reserved

One of our weekend projects was turning this vintage doll buggy into a mint planter. The plants inside are, from left: ‘Orange’ mint and ‘Ginger’ mint.

I bought the buggy last fall. It cost 5 bucks at a street sale. At the time, I didn’t know what I was going to do with it, I just knew I had to have it. Davin thought it was a bit of a wreck and did not appreciate taking turns pushing it home so I could finish drinking my coffee.

Since then it has sat outside on the roof. I originally stuck a pot of marjoram in it because I was concerned about damaging the integrity of such a gem by putting holes in the bottom. It held straw mulch a few days ago. A neighbour suggested I transform myself into the somewhat scary local eccentric by pushing the miniature pram around the block filled with straw. Baby needs to get some air!

Over the weekend I finally broke down and made some holes in the bottom using a hammer and a giant nail so we could turn it into a planter. Or rather Davin made some holes, although I want to make it public record that I did not force or even ask him to do it! There was some nasty water sitting in the bottom of the carriage. And let me tell you there is nothing nicer than a refreshing splash of rancid water on the face on a sunny Saturday morning.

The two mint plants that are now planted in the carriage/pot were originally intended for the community garden plot, but I already have a ‘Ginger’ mint over there anyways and the colourful foliage just looked like it was meant to live in that rusty old carriage. It’s not uncommon for me to grow or buy plants with an intended purpose in mind, only to switch gears at the last second. Some of my best ideas have evolved this way. I like this one a lot and was mentally patting myself on the back all weekend for coming up with it.

I can’t wait for the plants to grow and start trailing all over the sides of the buggy like gnarly tentacles!

Total cost of this container planting: under 10 bucks. Pretty good when you consider how much mint we’ll get out of it at the end of the season.

Leave a comment

Growing an Edible Strawberry Pot

Photo by Gayla Trail  All Rights Reserved

Strawberry pots have a bad reputation in the gardening world. They have poor water distribution and tend to dry out quickly. Sometimes they’re ugly. Or the pockets are too small. Or the pockets don’t have a lip, making holding soil in at planting time nearly impossible. The good ones are expensive to buy, if you can find one. I once spent an inordinate amount of money taxiing around the city in search of the right pot for a workshop. Three inferior pots and more money than I care to think about later and I was eventually forced to call a friend and beg to borrow hers. Is it borrowing if you never give it back? And four years have passed?

Despite their faults, I’ll be the first to stand up for strawberry pots. When they’re good, they’re really good. A good strawberry pot is an excellent way to grow food in vertical space. It’s especially useful when all you’ve got in the way of good light is a tiny patch on the balcony. Growing vertically allows you to get as much as you can out of that tiny patch. And they look pretty darn nice too. I like to fill mine with drapey plants that cascade over the sides. The trick to using them is in choosing the right kind of pot, and the right plants for that pot.

So what features qualify a strawberry pot as good?

  1. Large Pockets: Big pockets make planting the pots up a whole lot easier. Anything under 3″ is impossible to work with. How do they expect us to shove roots through a tiny hole? And why do I feel so dirty typing that? The lip also supports the roots while the plant gets itself established and provides more root space between plants. Lipped pots are also easier to water since the water has time to soak in rather than running straight out of the holes. When watering these pots I often direct the flow to the top of the pot and then to each pocket individually. That way I know that the plants aren’t sitting there in dry soil while only the top and middle of the pot gets wet.
  2. Pockets with Lips: Lipped pockets have a slightly raised side that keeps soil in while the roots grow. Eventually the roots will develop and hold everything in. My trick for pots with lips is to shove a bit of coir liner in there to stabilize the soil. I’ve also covered the hole with landscape fabric or newspaper before adding soil. Then I just cut an X and poke the roots through. It’s a bit of a juggle but it works.

Photo by Gayla Trail  All Rights Reserved
The pockets on this pot do not have lips but it makes up for it in larger pockets and a larger pot size.

  1. Ceramic Pots: Ceramic pots are the best of the bunch. They’re also the most expensive, but worth it. They hold water better than terra cotta and look a whole lot classier than plastic.

Photo by Gayla Trail  All Rights Reserved

My favourite strawberry pot (the infamous “borrowed pot”). Note the ceramic glaze, and large pockets with big lips that are staggered around the circumference of the pot. This version, planted up several years ago is holding the classic herbal mix with the largest plant, rosemary, in the top. Now, if only the pot were not white. I hate white!

  1. Staggered Pockets: Most pots have pockets that are staggered around the pot at different levels so that plants are equally distributed around the pot and not sharing space. But I have one pot that is shallow with pockets that are all at the same level. When I pot it up, which is basically never, the plants grow crowded and compete for space. Bad design.
  2. Big Pots: Bigger strawberry pots stay wet longer and provide more root space for plants. This is especially important if you’re trying to grow something edible. Don’t bother messing with those little pots they’ve got in the impulse buy section of the garden centre unless you plan to use them for drought tolerant succulents or some small thyme plants. That said, I have been hunting for a simple, small pot for years with no luck. But I plan to grow thyme in it.

What plants work best in strawberry pots?

Photo by Gayla Trail  All Rights Reserved

Well, strawberries for one. I grow a strawberry-filled strawberry pot every year. The roots are small and fit easily into just about any sized pot. If you’re interested in trying something new, look for varieties with colourful flowers (pink is common) or variegated leaves.

Herbs are another good option. Stick to drought tolerant herbs such as thyme, oregano, or marjoram if you’re growing in a smaller pot. Big pots can support a wide assortment of herbs. I grow a different mix every year, starting with cool season plants early in the spring and then switching them out for tougher, heat-loving plants that can take a bit of neglect once the summer kicks in. One of my favourite pots stick to one type of herb with a different variety in each pocket. I grew a mint mix last year that was stunning once the plants started to trail and produce flowers. It was nice to have so many different varieties of mint on hand to pinch off for tea.

Lettuce and other assorted greens will grow well if you start your pot early in the spring while the temperatures are cool. Create visual interest by growing varieties with different shapes, colours, and textures in each pocket. The pot show at the top of this page is filled with strawberries with a dark, frilly ‘Red Oak Leaf’ lettuce in the top.

I’ve included a printable list that will help you get started in choosing the right plant for your conditions as well as herbal mixes that will grow well together.

The Famous Watering Trick, Modified

As mentioned above, strawberry pots are known for having water distribution problems. One trick many gardeners have turned to is to insert a piece of PVC pipe with tiny holes drilled throughout, down into the centre of the pot at planting time. When you pour water into the pipe, the water flows down and trickles through the holes, allowing water to reach all nooks and crannies in the pot.

It’s a good idea, but it does not come without problems:

  1. PVC pipes cost money.
  2. PVC isn’t a particularly safe plastic to have around food.

To avoid these problems, I’ve been utilizing my own modified version that has served me well for several years:

  1. Scour recycling bins for plastic water bottles that are long, tall, and thin. Look for a bottle that is nearly as tall as your pot.
  2. Using the tiniest drill bit you can find, make lots of holes all around the bottle.
  3. At planting time, bury the bottle in the centre of the pot, with the top just sticking up above the soil line. Try to hide it behind some foliage.
  4. When watering, direct the flow into the bottle and fill. Now, cap it off. Capping the bottle seems to restrict the flow, giving the entire pot the chance to soak up the water, instead of sending it straight down to the bottom of the pot.
Leave a comment

Large-Flowered Bellwort (Uvularia grandiflora)

Photo by Gayla Trail  All Rights Reserved

Leave a comment

Growing Food on a Windowsill – Microgreens

Photo by Gayla Trail  All Rights Reserved

Winter is slowly coming to an end around here and it is nearly time to start lettuce outdoors. Until then I’ve been growing and harvesting small batches of micro-sized greens on my windowsill as a way to keep some salad fixings coming through the darkest and longest days of winter.

Microgreens are tender and tangy lettuce and mustard greens that are chopped off young, usually when they are only an inch or so high at the most and barely a few weeks old. They’re smaller and younger than baby greens, which tend to be harvested later when the plants have grown a good three inches tall or more.

It is this short growth span that makes microgreens possible to produce on even the darkest windowsills through the dingiest months of the year. Even the most beginner seed starter can take this growing project on since the plants only need to be kept alive for a few weeks tops. Unlike growing full-sized plants, it’s not the end of the world if they grow a little leggy (thin and stretchy) in the process.

Lettuce Greens to Try

Give yourself a break on the first time out by growing readymade storebought mixes that come in mild or spicy combinations. Some companies sell mixes that include the word microgreen on the package but any salad or mesclun mix can be grown this way. I like Urban Harvest’s Oriental Salad Mix (has a slight kick) and the Mild Mix prepared by Botanical Interests. Once you’ve got a taste for what you like try making your own mixes. It’s more cost effective and you can tailor make mixes that leave out any greens that don’t suit your taste buds.

Spicy: Peppergrass cress, ‘Giant Red’ mustard, radish, arugula, daikon radish, and ‘Wrinkled Crinkled’ cress.

Mild and Tangy: Tatsoi, mizuna, kale, lettuce, miner’s lettuce, and minutina.

Photo by Gayla Trail  All Rights Reserved

How to Grow

They’re not particularly attractive, but I grow mine in recycled plastic takeaway containers and clamshell packaging. They’re always on hand and tend to be the right size for the windowsill. To prepare, simply punch 5 or 7 drainage holes (I always go for odd numbers) into the bottom of a 9″ x 7″ package using an awl, sharp pair of scissors, or knife. Fill ‘er up with well-moistened container mix, potting soil, or seed-starting mix to within an inch or so from the top. Evenly distribute a thin layer of seeds, sprinkling them over the soil surface with about 1/8″ to 1/4″ of space between them. Cover the seeds with a thin layer of soil, about 1/8″ deep. Set it in the sunniest window you’ve got with the lid of the clamshell placed underneath as a drip tray. Water in well to get them germinating.

Photo by Gayla Trail  All Rights Reserved

Sprouts at about the one week mark.

Keep the soil moist like a wrung-out sponge but not soaking wet. To avoid over-watering, dunk out any water that is still in the drip tray within an hour of watering. Microgreens can be harvested with a pair of scissors in 1 1/2-2 weeks depending on how large you want to grow them. I generally let mine grow until the moment their first set of “true leaves” begin to peek out. The first leaves you see are called “seed leaves” since they are actually a part of the seed. “True leaves” are the second set to appear and often look very different than the seed leaves.

Starting Again

Unfortunately, unlike when growing baby-sized and mature greens, you can not grow a second crop from the same stems. This is because the plants you are harvesting are essentially sprouts. Second crops grow from the upper part of the stem above the leaves, and these are harvested on the lower part of the stem below the leaves. The bad news is that you will have to start over with fresh seeds to produce another crop. The good news is that you can reuse the pot and soil if there were no problems with disease or pests on the first go-around.

To prepare for another crop, simply yank the remaining roots and stems out of the soil, toss them in the compost bin, and till the remaining soil with a fork. Sprinkle on a fresh layer of seeds, top it with a thin layer of soil and the process is begun anew.

Start a second crop of microgreens a few days to one week after the first set and you’ll have continuous crops ready for harvest through the winter.

Leave a comment

Herbal Pillows for All Occassions

Photo by Gayla Trail  All Rights Reserved

I have already stated that I don’t care for the Holidays, and yet there are a few staples that I do enjoy: cooking and eating good food, making bath products for friends, super tacky over-the-top decoration, and sewing little herbal squares. I’m not sure what it is about the last one. I suppose it started out as a small gift for friends just like the bath products, but now-a-days I get a hankering to make them almost as soon as December rolls in, even if I don’t give them away.

The basic idea is simple: sew a square and fill it with herbs. The applications, depending on the size and what you put inside, are nearly endless. I grow a lot of herbs and inevitably there are a few that I always have in droves. Making an assortment of herb pillows for different applications is a good way to be sure the extra doesn’t go to waste. I figure, I go to the trouble to grow it and dry it, the least I can do is use it up.

Here are just a few ideas that can be applied based on the same basic principal:

  • Herbal Bath Tea – Mixed herbs inside a large muslin square with a little added oatmeal makes a healing and relaxing bath.
  • Brain Pillow – A large 6 X6″ cotton square filled with lavender or dried rosemary and some rice or flax seed can be used as a headache pillow, the weight of which feels nice on tired eyes.
  • Sleep Pillow – A bag made of scrap cotton, terry cloth, or silk fabrics and filled with lavender or dried hops makes a good relaxation pillow. Stick it underneath your own pillow to help you fall asleep at night. I collected a load of hops this year to test its’ ability to ease the insomniac into sleep, however I seem to be allergic to the stuff and get sneezy whenever I am near it. I finally get why I’ve never taken well to beer. Maybe it will work for you.
  • Dryer Bag – A small 5 X 5″ square filled with lavender can be put in the dryer to give freshly washed clothes a light, fresh scent without the chemicals.
  • Closet or Drawer Sachet – Fill up a small square with bug repellent herbs such as catnip, wormwood, lavender, rosemary, peppermint, juniper, fir, or cedar. Great for friends who have moth problems in their home.
  • Cat Pillow – Fill up a 6 X 6″ square with dried, homegrown catnip. My cat goes crazy for these little pillows and has been seen cuddling with them on many occasions.
  • Sachet d’Espice – Just a fancy way of saying a small open-weave muslin or cheesecloth square filled with culinary herbs (aka bouquet garni). Gift your friends with your favourite soup and sauce herbs that can be submerged directly into the pot like a giant tea bag and removed when cooked.

These little squares are so simple to make, all you need are some very basic sewing skills. They’re a great way to use up scrap bits of fabric too small for much else. Keep them as simple and easy-sew as you’d like or get fancier by embroidering or silk screening designs, adding ribbons and strings, or sewing in decorative edging.

Making Herbal Dryer Bags

The following instructions outline how I make the dryer bags, but you can apply these steps to any of the items listed above. Be sure to see the Herbal Bath Tea project for recipes and further instructions. I’ve listed a lot of materials and tools below, but you can easily get away with making these bags utilizing far less. A bit of fabric, a needle and thread, and some lavender flowers are enough to turn out a simple bag.

You Will Need

  • Dried lavender flowers (about 1/2 – 1 cup per bag)
  • Scraps of cotton fabric (Old shirts, sheets, towels, pillowcases, bits from old projects…)
  • Quilting ruler
  • Rotary fabric cutter
  • Scissors or pinking shears
  • Sewing machine (These are simple enough to hand-sew too)
  • Thread
  • Point turner (Knitting needle, chop sticks, or pencil will work)
  • Piece of scrap paper
  • Scotch tape
  • Pins

Photo by Gayla Trail  All Rights Reserved

1. Cut two 5 X 5″ or 6 X 6″ fabric squares. You can do these in two pieces of the same fabric or mix and match with contrasting fabrics. I make quick work of cutting the squares using a quilting ruler and rotary cloth cutter but a pair of scissors will do the job too.

Photo by Gayla Trail  All Rights Reserved

2. Pin the right sides together and sew a 1/2″ seam around the square, leaving a 2″ opening on one side, big enough for filling. Cut off the corners on a diagonal using scissors or pinking shears to help reduce bulk. Cut around the entire square with pinking shears (optional).

3. Turn the square right-side out and iron flat. Use a point turner to push the corners out.

Photo by Gayla Trail  All Rights Reserved

4. Open up the hole and fill the square with about 1/2 – 1 cup of lavender flowers. Getting the flowers into the hole can be a pain but is easily done using a paper cone. Make one by rolling a scrap piece of paper into a funnel shape. Tape it to secure.

Photo by Gayla Trail  All Rights Reserved

5. Pin the hole closed. Using a matching thread, sew a seam very close to the edge of the bag sewing straight across the hole to seal it up.

6. For a more decorative finish, sew a 1/4″ seam around the entire square. Use less flowers if you plan to do this since the extra bulk can make it difficult to sew. Try to keep the flowers away from the seam as you sew each side by pushing the flowers to the opposite side of the square.

Leave a comment