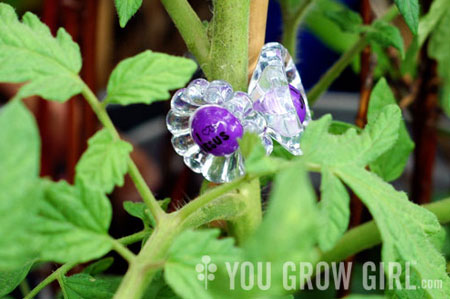
Tripod and Pea Staking

Photo by Gayla Trail  All Rights Reserved

Staking is one of those topics that I was sadly unable to cover in the Grow Great Grub book due to space considerations. I covered it pretty thoroughly in You Grow Girl and I have to say that years later, and having experimented with other methods, my go-to cheap and cheerful method both in the ground and in containers is still the tripod. I find it exceptionally stable, especially on my roof where the spring and later fall winds can turn epic. It is also the cheapest and most accessible — most of us can find a source of long bamboo poles close to home for less than a dollar per pole. I have even found the occasional multi-pack at the dollar store for even less.

    The tripod method is simply 3 or 4, or sometimes more, bamboo poles (branches work well too) set into the ground at an equal distance around a plant or within a container and then pulled together at the top and held in place with a strong piece of string or wire.

1cg_aug25.jpg

I have fashioned riffs on the tripod for tall plants and climbers including tomatoes, sweet pea, morning glory, pole beans, peas, and cucumbers. I add string or other supports depending on the type of plant I am growing. In 2007 I grew 16 tomato plants and several cucumbers by building 4 sets of 4 tripod stakes supported by 4 poles around the top as cross beams. The added support proved to be unnecessary and drove us nuts all season long as we continuously (and painfully) ran into those stupid cross poles with our necks and heads. A single indeterminate (vining) tomato plant was supported by each pole and I strung mesh along one side that supported the cucumbers and gherkins. You can read more about that over here.

p.s. That’s the ‘Variegated’ tomato in the foreground/left. You can just make out the white splashes in this small photo.

I have even made smaller versions using shorter poles to prop up heavily laden bush beans.

But I didn’t intend to talk about tripod staking today so I’m not sure why I am preambling with that. Today’s topic is pea staking. Of all of the easy, or what I coined “artfully lazy” methods in You Grow Girl, I like pea staking best, most especially when it comes to propping up it’s namesake: peas.

    Pea staking is as simple as locating a bunch of twiggy branches (messy end growth with plenty of small twigs and branches) and then setting them into the soil with the solid end down. Next, plant your seeds in and around where you have set them into the soil and wait for the climbing plants to hitch on and eventually cover the branches in greenery.

This method works both in the ground and in pots. While bare, it appears orderly and decorative in pots, but can just look like a bunch of branches stuck in the ground if used in a large, empty garden bed.

Photo by Gayla Trail  All Rights Reserved

Last year, while walking home from the greenhouse, I came upon a large bundle of bright red, freshly cut dogwood branches. I had about a minute to brainstorm projects I could make with them and whether or not it seemed worth the effort to drag that bundle all the way home. In the end I decided that the dogwood was beautiful and chances were good that I might never come across sidewalk gold like that again. I walked a treacherous gauntlet back to my abode, and despite nearly poking the eyes out of hundreds of hipsters and small children, I was right, they were worth it. I haven’t seen a bundle of any branches, let alone dogwood branches that nice since.

I used all of the branches up; some in big pots as below and smaller branches in smaller pots. They made the pots look like something was happening while they were empty, and the red provided a beautiful contrast with pale green pea plants as they entwined themselves in the branches.

Here’s how it looked when the peas were fully mature. I believe this pea variety is ‘Carouby de Maussane.’

Photo by Gayla Trail  All Rights Reserved

Leave a comment

A Swell Fencing and Privacy Screen Idea

Photo by Gayla Trail  All Rights Reserved

While in St. Lucia I was given a tour of Jade Mountain eco resort. I’ll save the interesting gardening and botanical design features for another day; however, take a look at this simple, yet elegant fencing or privacy screen idea. We found this in the parking lot of all places. When you’re the #1 resort in the Caribbean, you leave no detail or corner unaccounted for.

Photo by Gayla Trail  All Rights Reserved

Here’s a close up on the construction to give you a better idea of how it is put together. I have no idea what kind of wood they are using here but I’d imagine you could find some long, flexible strips in an affordable material that would work. It looks a bit labor-intensive with such thin strips, so a nail gun would be necessary to make easier work of it.

Photo by Gayla Trail  All Rights Reserved

The hanging basket combination, a staghorn fern and some kind of caladium(?) is pretty cool too.

Leave a comment

Extending the Harvest

Photo by Gayla Trail  All Rights Reserved

This piece was originally published in The Globe & Mail over the weekend as a part of my series on kitchen gardening.

Regarding using burlap and burlap sacks: Just to be clear, do keep them away from the crowns of your plants since they can get awfully heavy when wet. In fact, they are best used over the winter to prevent the erosion of large, open patches of soil from which annuals have been removed. Even better still, place the dead plant matter (browns) and some kitchen scraps (greens) underneath the burlap and you’ll have fresh compost on the spot come spring.

———————–

I love a fresh, crisp fall day. Many of us would agree that it would be the best season of the year if not for the fact that it is a stepping-stone to the inevitable: winter.

Who knows what this fall will bring given the wacky weather hijinx we’ve experienced this year. But let’s pretend for a moment that everything will go as planned and there won’t be snow sprinkled on the peppers tomorrow morning (please gods). We can’t control the weather or stave off the inevitable, but as gardeners there are a few methods we can employ to hold back the effects of seasonal change and keep the party going just a wee while longer.

You’re already one step ahead if your garden is a raised bed. They warm up slightly early in the spring and tend to stay warmer as the fall cools down. A thick layer of mulch such as straw, buckwheat hulls, or shredded newspaper keeps the soil and surface roots warm through nippy nights and breezy fall days. An actual blanket made of burlap gets the job done too, but can get awfully heavy when wet so be sure to cut big holes to keep it off the crowns of plants. An even better blanket still is black plastic. The dark colour attracts the sun’s rays and the plastic holds moisture through fluke fall droughts.

In lieu of cumbersome blankets, which can be difficult to maneuver in small spaces, or used alongside them, are an assortment of store-bought and homespun contraptions that can be fitted over individual plants or entire beds to trap warm air and create the effect of a miniature greenhouse. Hoop houses are toasty-warm tunnels made of metal or plastic hoops draped with a clear plastic tarp that let’s light in and keeps warm air from escaping. You can buy them ready made from garden suppliers such as Lee Valley or make your own inexpensively using bendable metal shaped into arcs or dollar-store hula-hoops cut in half. Push the arcs into the soil intermittently to support the length of the tunnel and cover with a big sheet of plastic. Secure the plastic in place by stapling to the sides of raised beds or with clips purchased at the hardware store.

Greenhouses made to cover individual plants are called cloches. Fancy glass cloches are nice to look at but expensive at about $30-40 a pop! Never mind, you can make as many as you like in a variety of sizes for free from plastic water bottles rescued from the recycling bin. Simply cut off the bottom and set the cloche over tender greens or frost-sensitive plants you’d like to keep in the garden just a little bit longer. Keeping the cap in place locks warmth inside, or you can remove it to water your plants and let heat escape on particularly sunny days.

Cold frames are the way to go if you’d like to get a shot at keeping particularly cold hardy greens such as mâche, kale, spinach, and arugula producing food straight through into the winter (and beyond). It’s really nothing more than a low-tech box with a hinged glass or plastic lid. The trick is to dig the box at least a few inches into well-draining soil and give it a south-facing position. Open the lid when it gets too hot, and insulate both the sides and top with newspapers, straw, and old burlap sacks when night temperatures drop below freezing. They’re not exactly practical when growing up on a roof or in pots but compact versions set on top of a planter box will ensure at least a few extra homegrown salads this fall.

Leave a comment

Special Order for Comfrey

Photo by Gayla Trail  All Rights Reserved

I recently wrote about the nutritional benefits of mulching and fertilizing with sea kelp. A commenter mentioned using comfrey, to which I replied that I am a big fan of comfrey as a fertilizer and would recommend it as a mulch, although I would suggest chopping it up or drying first since the leaves are very large and would form a dense mat when wet.

Comfrey is definitely worth growing as a ready made source of potassium, magnesium, and phosphorous if you’ve got the space. The trouble is it is awfully aggressive and will take over where ever you plant it, and then some. This is why I don’t grow it. I do however, have a secret location where I go every year to harvest a bit to make into liquid feed. That was until this year when I went to harvest from my secret stash and discovered it was no longer accessible. Noooooooo……

The tally so far: Summer is too wet and too cold, the tomato harvest is mostly crappy, and I can’t get any comfrey. The horrors.

But then, a happy turnaround. The other day I ran into a fellow forager/gardener. The subject of nettles came up which lead to comfrey and my recent loss. She mentioned that the farm she works for has a huge patch of comfrey that they use for making their own fertilizer. All I had to do was pay for the time it takes her to pick the leaves. Two days later I rode over to a local market and picked up a big box of comfrey. And while it did rain briefly, Monday was oppressively hot and humid so I stopped at the hardware store on the way home and bought a fan for my office window. Then I balanced a box of comfrey and a fan on top of my bike basket and walked it home because I am not adept enough to ride while balancing both, unlike those dudes you see balancing a twenty-four case of beer (we call it a two-four around these parts) on top of the turned around handlebars of their 10-speed with one hand and a six pack dangling from the other. While I’m on the subject of death-defying balancing feats on a bicycle, I once saw a guy balancing a massive rug on the handlebars while riding. On another occasion, I witnessed a guy with a TV, although that didn’t work out and the TV smashed onto the road.

And that, friends, is the story of the week summer finally arrived (we’ve had sun AND heat for days!), hope returned for our tomatoes, and I got my comfrey. Things are looking up.

Photo by Gayla Trail  All Rights Reserved
1. Chop up the comfrey with a pair of sheers or scissors and soak in a tub of water. I put a brick on top to hold it all underneath the liquid. 2. Let it sit for a day or two until it gets stinky and the leaves are broken down. 3. Strain off the leaves and put them in the compost bin or bury them in the garden. 4. Use the remaining liquid as a fertilizer by spraying on the leaves of your plants or pouring into the soil around the roots.

Leave a comment

How to Compost and Reduce Waste

Photo by Gayla Trail  All Rights Reserved

Since The City of Toronto is week three into a city workers strike that includes garbage collection, it appears (see above) to be a very good time to reintroduce some resources on small space composting.

One sure-fire, easy way to compost that I haven’t included here is to dig a hole. Yes, like the infomercials say, It is that easy! Dig a deep hole, put the scraps into the hole and cover it over. Done. Dig a really deep hole if you plan to bury crab and shrimp shells, fish parts, or anything that might attract vermin. Your plants will love it!

In lieu of digging a hole, I present to you these other very viable options:

Leave a comment