Repurposed for the Garden: We Recycle!

I’ve taken the message on the side of this recycling bin quite literally and am recycling it by turning it into a salad greens garden.

This house came chock-a-block full of junk, especially the backyard. Not that I’m complaining — we’ve found new uses for a great deal of the items and have saved some money in the process.

First up are the recycling bins: there were several, but we have no traditional use for them as living in a house means we are able to keep a large-sized recycling bin that suits most of our recycling needs. It was practically impossible to keep one recycling bin for any length of time while living in an apartment — someone was always stealing them off of the curb! And now, here, we have too many. Go figure.

Fortunately, recycling bins make great planters, if you can get past the ugly. We’re still in a yard renovation holding pattern as we now realize that a tiller is required if we’re going to manage the back breaking work of levelling it out. I originally thought we could do the work by hand because I’m not a big fan of tillers and may have also been overly optimistic when the snow was still on the ground, and the backyard garden was just a dream. Levelling out a bumpy, slopped garden requires time, something I don’t have right now as we are in a crunch to layout book #3 (due out in Spring 2012!). I also have some stray photos to take. As a result, I can’t get my raised beds in place, which means I can’t plant spring greens or peas. GAH! One of our big goals this year is to become completely self-sufficient in salad fixings. Starting next month (or so), I don’t want to buy a single head of lettuce ever again, if I can help it. This should be easy enough to achieve over the long term as I intend to dedicate a rather large bed to greens alone. So exciting! Obviously, this goal is unachievable if I can’t plant….
Read more…

Leave a comment

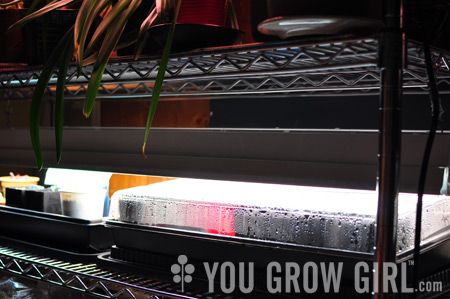
Build a D.I.Y Lighting System

When we moved, I abandoned the cobbled together grow light setup I had been struggling with for years in favour of beginning again with a much improved, bigger and badder system.

In the old place I had to stuff the grow light shelving system into a corner nook of my office. Consequently, it couldn’t be more than 2ft wide. Have you ever tried to buy a shop light that is only 2 feet wide? Good luck. Yes, they are available, but they are built in a boxy shape and are meant to be wired in as under-cabinet lighting. I had to do a bit of precarious electrical wiring in order to attached a plugin cord to my lights. Because they were mounted and stationary, I had to lift my seedlings up to receive the necessary amount of distance between them and the bulbs as they grew. This meant regularly adding and subtracting stacks of books that I had placed underneath flimsy trays that wobbled and spilled liquid whenever they were shifted.

As you can imagine, this method did not always work out well for the books.

And then there was the shape of the shop light boxes themselves. Boxy shapes with sides that come down straight don’t reflect light well. I made due, but the set up was what it was. At the time I was happy to take what I could get.

So when we moved I abandoned that mess of wires and spare parts with the dream of something less ramshackle in mind. And then… work, life, moving, stuff. Finally, it all came to a head during the Holidays when the unheated front porch froze and several plants that should not have been out there but had no where else to go, froze. I needed a lighting system stat.

Here’s what I built.
Read more…

Leave a comment

Cheap and Cheerful Water Feature

Today, as I was going through folders of photos I took through the spring and summer months, I came upon this cheap and cheerful water feature my friend Barry devised for his garden. It looked so classy, yet was unbearably simple and didn’t cost a thing.

All he did was take three terracotta saucers of varying sizes and stack them into one another. He set overturned plastic saucers underneath the top two layers to give them height. Brilliant!

The water feature did encourage a lot of wasps to a warm and dry part of the garden, which may not be your thing, but it turned out to be a simple and stylish way to encourage and keep these beneficials doing their work in the garden. No one has ever been stung.

Leave a comment

Making More Herbs

Photo by Gayla Trail  All Rights Reserved

About a month ago, I wrote a guest post for Apartment Therapy/Re-Nest on propagating herbs by cuttings. This is how I quickly double my basil harvest every summer at no extra cost. Basil grows easily from seed too, but stem cuttings are fast and easy — they’ll produce roots in water in about a week or two! By mid-summer my collection of scented geraniums (Pelargoniums) are huge! Why not take a few cuttings and share the wealth with friends?

On the Re-Nest site someone asked a question about taking cuttings from bolting plants. I have not been able to post a comment so I am adding a reply here.

SoRad: We grow basil like an annual in colder climates, but in tropical conditions the plant is a perennial. There are also varieties of basil that are reproduced by cuttings only… they don’t produce seed. Some basil varieties bolt quickly and constantly, while others only do-so when the weather gets really hot.

Bolting when it comes to basil is more about the conditions a particular variety prefers rather than “age.” It is better to take cuttings from plants that aren’t under heat-stress, but I have found that it can be done successfully — your best bet is to move the rooting cuttings to a cooler spot.

Read more…

Leave a comment

Hanging Colander Lettuce Pot

Photo by Gayla Trail  All Rights Reserved

You are looking at one of this year’s serendipitous brainstorms. I feel perhaps a little bit too genius for coming up with it, when really, it’s just an enamel colander filled with ‘Sea of Red’ cutting lettuce and hanging in a wire basket. I quite like it. So much so that I haven’t had the heart to harvest it! Yet.

Here’s how this happy marriage came about. I had this heavy wire hanging basket sitting around, going unused. It’s the sort that is typically lined with coir, which is fine in most gardens but hard to keep hydrated on a hot and sunny roof. While, I’ve found it difficult to use as-is, I’ve kept the basket waiting for a new use to present itself. Despite the issue with hydration, stylishly understated and black hanging baskets made of a sturdy materials are hard to come by so I wasn’t about to get rid of it.

I bought the colander at a local secondhand store with the expressed purpose of growing greens in it. I liked the pairing of butter cream with bright red trim. The holes are small enough to hold soil without adding an extra liner, and the drainage they provide is perfect for growing small greens or herbs.

Photo by Gayla Trail  All Rights Reserved

Once I had planted up the colander, I thought it might be better served sitting up off the ground. Low and behold it fit perfectly inside the otherwise useless wire basket. As an added bonus our digging mammal visitors (squirrels, raccoons, etc) have not been able to get at it, while a second pot of ‘Sea of Red’ cutting lettuce has been dug up several times over the season.

Incidentally, I have experimented with this particular variety by growing the heads spaced at a distance from one another and tightly clustered as you see it here. I prefer it grown together and like the way the spear-like leaves create a literal sea of rich, mahogany that lights up when the sun hits it just so. It’s as satisfying to look at as any flower basket I have grown and I might even eat it for lunch sometime soon before the plants bolt.

Leave a comment