One of the first homemade brews I made last year when the bug for fermenting things caught me was a jug of hard apple cider. I played it safe that first time out of fear and trepidation, which in hindsight could have entirely ruined those good bottles of expensive, unpasteurized, organic cider had it not worked out in the end. The process I followed had me boil the cider to kill off any naturally occurring yeasts and then add grains of commercial yeast. The reasoning behind this process is that the commercial yeasts are a known quantity, while allowing the cider to ferment from the yeasts that naturally occur in it and the air in your home is an unknown that can result in a nasty, undrinkable batch of hooch.
Since then every natural yeast brew I have made in this house has turned out wonderfully so I’m moving away from a dependancy on the commercial stuff and prefer to give over to the magic and surprise of the unknown.
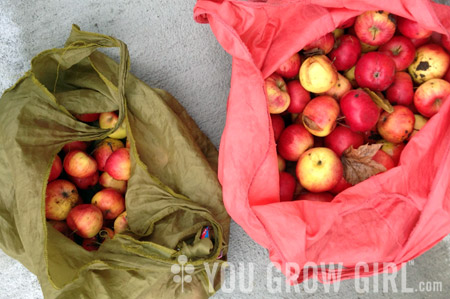
Despite those early fumblings, my first batch of hard cider was a hit with friends and I was eager to make more this fall. Unfortunately, local apple crops suffered this year due to an abnormally warm early spring followed by a sudden and severe cold snap. Cider hasn’t hit any of the markets that I frequent yet. Fortuitously, I discovered a couple of large crabapple trees on derelict land this year. The fruit had recently fallen off of the trees but were still in very good shape with only light bruising and few that were too far gone or rotten to bother. They smelled sweet and were only slightly sour — not great for eating, but certainly worth foraging and brewing into some kind of apple wine/cider-like drink. Worst case scenario I waste time, but the actual cost to try is pretty much negligible.
I don’t have a cider press and did not have the ambition to construct one. My goal with this brew was to go as simple and straight forward as possible. No fuss and minimal work. I consulted my country wine making books and found Andy Hamilton’s Sort of Cider in his fantastic homebrew manual, Booze for Free [Note that this is a yet-to-be-released paperback and Kindle edition. I was able to get the original on Kindle but could not find it on Amazon.]. You can see the ‘Sort of Cider’ recipe online here. I did not follow Andy’s instruction exactly. I did not want to use packaged yeast and I did not want to add flavouring (although the ginger does sound good).
Here’s how I did it:
RECIPE: Almost Free Foraged Hard Apple Cider
- 1 kilogram foraged apples
- 4 litres of warm filtered water (Since I was using tap water, I boiled mine first and let it come down to a warm, not hot temperature)
- 500 grams sugar
Wash and sterilize a large fermentation bin. I used a plastic food-grade fermentation bucket that I purchased for $5 at my local wine supply shop.
Wash and scrub the apples to remove any dirt from the crevices. Cut out blemishes or particularly nasty bruises and rot.
Using a standard-sized metal grater, grate all of the apples (skin and all), right down to the core. Following what I know from years of making homemade apple sauce, I decided to toss both the core and the seeds.
Add the apples to the bucket along with the water. [I should note here that this is where I screwed up. It was late, I wasn’t thinking and accidentally added the sugar. Fortunately I had not yet added the water and was able to remove most of the sugar without incident. What I have learned through wine making is that it is better to let the yeasts feed on the available sugar in the fruit first before adding more.]
Cover lightly with a clean, cotton kitchen towel and set aside in a warm spot for about 10 days. I do all of my initial ferments in my dining room because the light there is dim and the temperature is warm and stable.
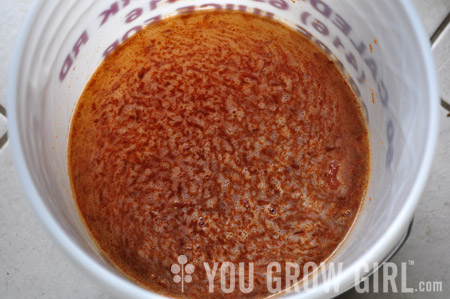
Stir the brew each day and re-cover with the cloth. Eventually you will start to see bubbling and the brew will smell boozy and delicious. There should not be any mould. It should look like something this:

At this point you can go ahead and strain out the grated apple bits through a cheesecloth. Pour the liquid into a sterilized demijohn (aka carboy) affixed with an airlock. Add the sugar. Andy’s instructions suggest leaving this to ferment for a further 10 days before siphoning into bottles. I am not at this step yet and since I am not using a commercial yeast, I can’t say from personal experience if 10 days is accurate for my brew.
Andy also says that the brew is volatile and should be drunk while young. Again, I am not there yet so I’ll have to update you when I arrive. I am using wild yeasts which may not be as volatile as the commercial brands tend to be. I know from last year’s brew that it tasted better with some aging. I was hoping to age this too, but again, I’ll figure out what is best when I get there.
Of course, all of this could turn out horribly, but since it cost almost nothing to make, it is worth the fun in trying. I’ll let you know how it goes.
Have you tried making a foraged apple brew in the past? How did it work out for you?
Update Oct 2013: A year has passed and while much of this brew has been consumed, I do have some left that has aged and is fine, at least according to friends. All of the times above were accurate. The only thing I will change in the future is the quantity of sugar — it was simply too sweet for the apples I used. If your apples are tart I would stick with the quantity above. If they are sweet and good for eating, I suggest reducing the quantity somewhat. Friends liked the cider, but I found it to be too sweet for my palette.
I made cider using Sandor Katz’s recipe from the art or fermentaion and it turned out wonderful. The only downside was that half a dozen bottles exploded! I was cleaning up cider and glass for weeks to come! This sounds a great way to use up apples. I will have to give this a go. Keep us posted on how yours turns out.
I’m sorry to hear about your explosion. Nightmare! I did elderflower champagne in plastic bottles this summer because I was so worried about exploding glass.
It will depend on the wild yeast strain that “infects” your brew as to how volitile or not the cider will be. I do say that it should be drunk whilst young, I said that as I didn’t want to be responsible for exploding bottles all over the world! You chould of course syphon into a secondary after the initial ferment and before bottling. A carboy with an airlock and bung will do the job.
Quite right about Booze for Free USA editon is out in February 2013 and UK edition is now in the 4th print run! Remind me in Feb and I’ll make sure you get a free copy just for calling it a ” fantastic homebrew manual”. (made me smile).
Very glad too that you are “freeforming” with the recipes, exactly as I intended!
Ah right, it’s the US edition. I never understand a need for a new edition when it’s the same language! I certainly did not have any trouble understanding your crazy Britishisms (kidding! Canadians are practically half British and we use a lot of the same phrases)… I meant every word. It’s a great read and I love that you encourage readers to experiment.
Right about the exploding bottles. I guess I just assume most home brews have the potential to be explosive — gotta check them!
I did mention a secondary ferment in a demijohn/carboy, but added the addition of the airlock in case that wasn’t clear.
Thanks for jumping in!
This sounds so much easier than how I made cider without a press last year: coring apples and putting them through my $60 juicer, then pressing them through an old tea towel by hand! I was more set on making vinegar than hard cider, so I put the juice into an empty 5L white vinegar bottle, topped it with a pinpricked ballon and let it do its thing. I did taste it when it reached the hard cider stage (mostly by accident associated with siphoning it off) and it was pretty awful. The vinegar though is very nice, and I had enough that I didn’t need to make more this season. Hopefully next year will be better for apples and I can try this method… it sounds like it would be far easier.
Very good point about vinegar. There is always vinegar…
I’ve been threatening to try my hand at cider making for a few years, and this may just be the time I drag out my homebrew equipment and do it! I’m fortunate to have a few 5 gallon corny kegs, so no worries in regards to exploding bottles!
I’m curious if this recipe and amount of sugar leads to a sweeter cider than I’d prefer. I tend to like dry ciders. Any thoughts?
I’m not sure because mine isn’t done yet. It’s tricky because it does need the sugar since this isn’t technically cider. There is a lot of water added. I don’t typically write about processes when I haven’t been all the way through… but in this case wanted to get it on the site while it is still apple season.
… if I had known it was that easy then I would have been making this cider for … uh… ever!
And that’s a great tip, looking to a wine supply shop… I’ve been needing a vessel for making fermented drinks/foods too! Thanks, as always Gayla!
And I’ll be checking in on that book! I’m always interested in finding new ways to save money on things I use/eat/drink everyday… booze is definitely one of them! ?
Great instructions, thank you!
One of my friends makes rhubarb wine and freezes the rhubarb first. He says when he pulls it out of the freezer and lets it thaw, it really helps with extracting every ounce of juice possible. Maybe this would work with apples too.
With regards to volatility, the yeast in ciders tend to produce sulfur during fermentation and many homebrewers like to bottle condition them for three to six months to allow them to mellow.
However, since you are using open fermentation, it’s likely that you also have some lactobacillus cultures living in your brew; that’s not necessarily a bad thing, but it does mean that it will become more and more sour as it ages.