Sempervivums or Hens and Chicks as they are commonly called, are an incredibly hardy, and drought tolerant succulent that can take a fair amount of abuse, yet when I was starting out on my roof, they were the last plant I wanted to grow. I’d come to associate them with the few that had been slapped into the tiny front garden of my childhood home. And while I had fond memories of playing with my dolls on the pretend Martian landscape they created, my overall impression as an adult was that they lacked a certain luster.
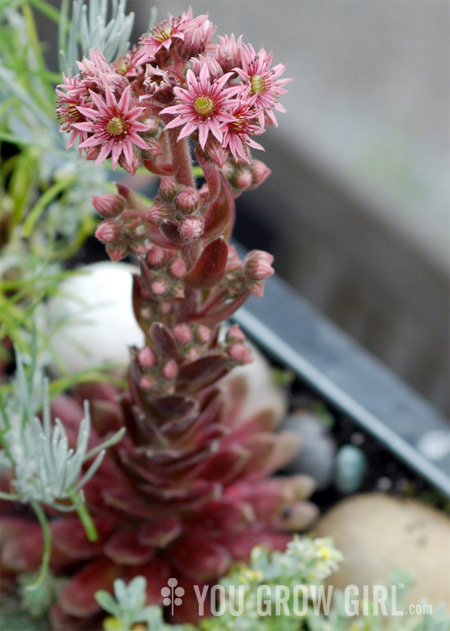
I don’t recall how it happened, perhaps nostalgia won out, but I eventually came around to growing a few. That summer they bloomed, creating exotic, alien-like flower stalks. I was hooked and decided I would never be without them again.
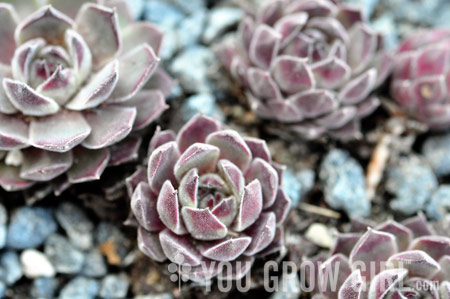
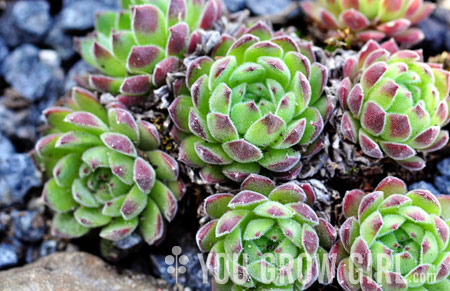
It turns out that sempervivums are anything but pedestrian. Did you know that there are literally thousands of varieties available in all sorts of sizes, colours, forms, and leaf textures? Sempervivums are an alpine plant that grow in rocky, mountain areas at a high elevation. This is what accounts for their tough-as-nails constitution (their name translates to “ever living”). They grow well in shallow pots and can be stuffed into the tiniest crevices, making them an excellent choice for balconies, fire escapes, and other tight spots.
Yesterday afternoon I attended a plant sale hosted by the Ontario Rock Garden Society where I purchased several exciting sempervivums to add to my collection. Because I was able to purchase plants directly from local nurseries, the prices were fantastic, far better than some of the outrageous prices I’ve paid at local garden centres. For example, a great number of the plants I bought were 4 for $10. Yes, that’s a little bit more than a typical sempervivum…. but these were not typical sempervivums.
And so, I went a little bit nuts. And now I have to put them all somewhere. I’ve begun potting them up and am very satisfied with what I have done so far.
Here’s how I did it:
Where to Grow: Semps prefer full sun and very free-draining soil. They can tolerate some light shade but will grow leggy and weak if the light isn’t strong enough. They grow well in rock gardens, stuffed into walls and roofs, or in pots.
Growing in Pots: Use a shallow, terracotta pot with holes in the bottom. I used a 14″ X 10″ pot that is 4″ deep. Stone and hypertuffa troughs are also excellent choices that happen to be a bit tougher than terracotta and better suited to over-wintering outdoors in a cold climate. I’ve been growing in the same hypertuffa trough for years with no discernible wear and tear. Some people protect theirs underneath plastic sheets and fleece or burlap for the winter but I have never done a thing. Most of the sempervivums I have grown this way have survived.
Choose potting soil that is very free-draining (30%+ grit and sand). I suggest starting out with a bag of specially prepared cactus and succulent mix. You can also add lots of small grit or more horticultural grade sand to improve the drainage of regular container mix. To further improve drainage, stand your pot on top of bricks, small pieces of wood or rocks so that the pot isn’t sitting directly on top of the ground.
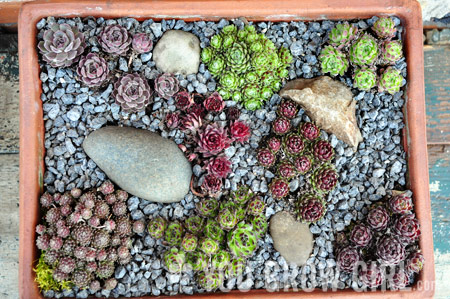
How I Designed Mine:
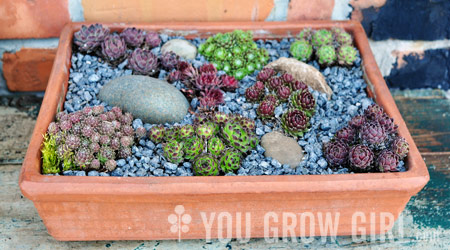
- I choose four rocks that I happened to have on hand to use as the anchor for the layout of the pot. I tossed them in rather randomly and then slowly added the plants in around them. The plants will propagate and spread through the summer, eventually covering some of the rocks and filling in some of the gaps.
- I chose plants within a similar colour scheme (lavender/red/, dark red and green) and leaf texture (small, soft, leaves with fairly tight rosettes). I wanted every plant to get a fair shake and felt that anything too contrasty (white) or different (big rosettes) would stick out and grab all of the attention.
- Once everything was planted, I added a layer of dark gravel mulch to create a uniform background. Gravel also keeps the squirrels from digging in the pots and helps stabilize the soil when you water.
- To clean it up, I brushed the excess soil off of the plants using a soft paintbrush.
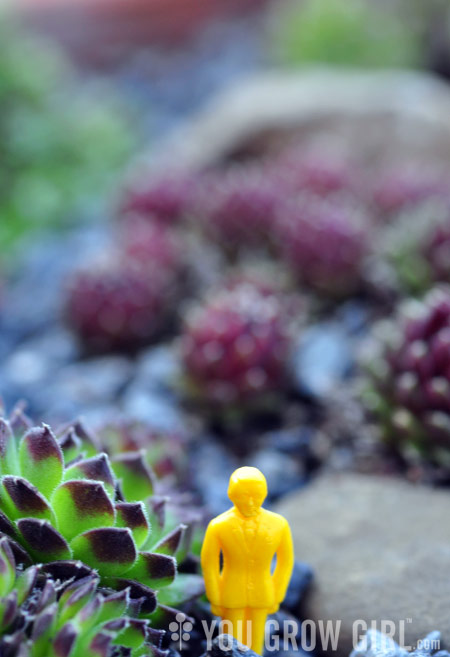
And while it may not be a Strawberry Shortcake doll, I added in a little figure as a tribute to my childhood play.
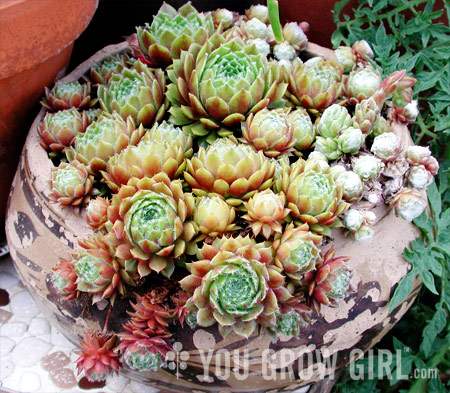
Here’s another simple pot I grew several years ago using a piece of Mexican pottery I bought at a thrift store for a dollar.
Related Articles:
- Cheap n’ Easy Container Idea: Succulent Window Box 2007
- Succulent Window Box 2006
- Barry’s Garden Open House (Scroll about halfway down the page to see the sempervivum pots)
Gorgeous and inspiring. I’ll have to revisit sempervivums now. Do they survive Toronto winters?
Really interesting & attractive collection, Gayla. And thanks for the detailed step-by-step instructions as well as design tips. Very helpful. After I get all the seeds sown (that’s the priority right now) & if there’s space on my balcony, I’d love to make a succulent garden.
Suzanne: Yes, they are hardy! I am even able to overwinter them on the roof.
Lovely. I’ve been looking for cute stones to add to my pot. Thanks for sharing.
So pretty!
I am so excited!! My 12 year old would love to do this too! I’m going to start searching for cool containers:) Thanks for the idea and inspiration!
I remember an elderly couple who lived next to us when I was growing up. The woman died when I was about 5 and the only memory I have of her is her showing me “hen and chicks” in the garden she had.
I love the way you have arranged the plants surrounding them with gravel and small rocks. It is very attractive.
This is fantastic!!!! I want to postpone my next planned garden project and do this now!
You’re right they really are quite tough. I’ve got a large pot of them which gets put under the greenhouse for the winter since it’s too wet here in the winter for them. They are actually quite happy potbound and cascade over the side of the pot in a really pretty manner.
I’ve just planted some in a brick – the kind with the three (or sometimes six) holes in it. I packed earth into the holes and then carefully separated the plant and put a small piece in each hole. Looks great. I got the idea from a British gardening book, though I can’t remember the name of the book or who wrote it.
Inspiring post. I like the notion of growing them in pots, although Toronto is a lot warmer than Northern BC.
What, no plastic stegosaurus? I’ve taken a few of Munchkin’s plastic dinos and used them to decorate things that look like they belong in Jurassic Park like the horseradish plant with its huge deeply serrated leaves or even early droopy corn seedlings or okra with its palmate leaves. I may not be able to grow seed ferns here, but I’ve got a good imagination!
Another tip for wintering over Semps is to keep them dry. In winter store them under the eaves of your house or under a piece of garden furniture. They don’t seem to mind the cold, but they don’t like wet feet.
I too love sempervivums and grow them in all sorts of containters.
I love cacti and succulents and also hypertufa. One of these days, i’ll try to make my own becus they cost so much elsewhere.
I love succulents, especially hens & chicks. I have not yet tried to plant them, but I’ll be bookmarking your post for tips. Great pictures, by the way!
Beautiful! I love your posts on succulents! One of these days I’m going to start my own pot of them!
Oh Gayla! Your Mexican pot of sempervivums is fantastic! Quick, simple, and inspiring.
So beautiful! Since I read your book, I have a new found love for succulents…up till now I only had some winter-hardy ones (I think they are semprevivums) growing in the front yard and now I have 6 varieties! I love your design too.
you’ve made me re think about using sempervivums adore your first image, beautifully positioned healthy plants, love the rocks also
I have several troughs and pots around my pool. I use hens and chicks and portulaca for color. They can stand the heat and don’t need constant watering like annual planters do. They have made it through several winters and the portulaca reseeds itself.
For some reason I’ve never really used hen and chicks in my yard, but I think this year may be the year for a container garden design with them in it.
We just planted some hens and checks in a pair of old work boots, but we used regular old potting mix. I’ll have to get my husband to dig them out and mix a few handfuls of sand in with the soil.
I love the project you created. I’ve never seen more than one variety, but I’ll be on the lookout now. I may have to mail-order them.
Well, my sempervivums are definitely not living forever. I found an ashtray carved out of solid stone (Alabaster? It’s yellow) at Value Village and thought it would make an awesome succulent container. I think I must have overwatered them.
Did you drill a hole in the bottom of the Mexican pottery for drainage?
Sherri: Oh yes, you’ve always got to drill holes. They require good drainage. Lack of drainage will definitely kill them.