
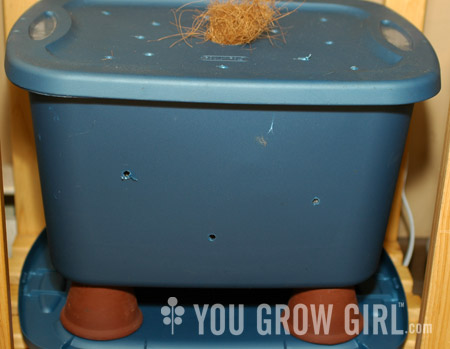
My composting worms are housed in an average-sized bin that we keep in the hallway just outside our apartment door. This spot next to the recycling bin is great three out of four seasons of the year since it saves precious space inside our apartment and is the perfect distance between the roof garden and the kitchen. Unfortunately, the winter season poses a problem. The hallways are heated but just barely, not nearly enough to keep redwigglers (Eisenia foetida) alive.
This year, rather than lugging the big bin into the apartment and living with it underfoot until spring, I decided to downsize. The population in my bin is pretty tame right now. It’s good for the worms to have lots of room in the bin but mine were the equivalent of a two person family living in a monster home. Resizing and moving the contents was easy enough. The bin wasn’t ready to be harvested so I simply prepared a new bin using a smaller container I already had on hand. The worms went into the new bin, bedding and all.
They needed a small top-up of bedding so I shredded some used paper bags I had been saving and moistened it slightly before adding it to the bin. I’ve tried a variety of methods and materials for making bedding over the years and brown paper or paper bags shredded in a paper shredder is my favourite way to go. I don’t mind newspaper but prefer not to use it for reasons that really only come down to pure vanity.
Improvements
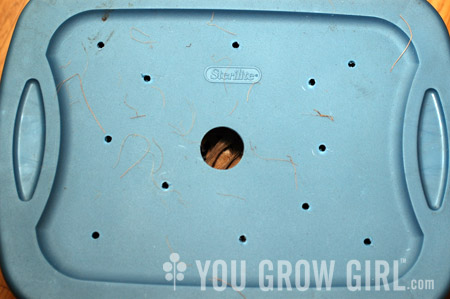
I made a few changes to this new bin based on its size. I was most concerned about creating good air flow in such a small bin so I added a few extra holes to the bottom and top with a few more added to the sides. I also added a large hole on top using a drill bit meant for making doorknob holes. I added a piece of coir planter lining, which can be pulled out to increase air flow. I did this because sometimes the bin can get too wet, requiring me to prop open the lid to increase circulation. This works well but I tend to forget about it and leave it propped for too long, sometimes drying out the bedding more than I had intended. The idea behind the larger hole is to regulate air flow more subtly. We don’t have vermin so there is no fear of mice getting into the bin through the large hole and taking up residence. If you do have mice that come in for the winter I would suggest adding more small holes and skipping the larger hole.
Another little trick I’ve come up with over the years is propping the bin on top of small flower pots. Bricks and cans work too. Propping the bottom up allows for better air flow underneath the bin. And the extra plastic lid underneath catches any run-off which can be saved and poured onto your plants as fertilizer.
In Conclusion: I Rule
We’ve been living with the new bin for about 2 weeks now and so far it has been great. I love it and have offered myself numerous mental high fives since making the shift. As you can see, the new bin fits perfectly underneath a table in the kitchen so composting takes about 5 seconds. The new larger hole on top has been genius — I haven’t had any problems regulating air flow and have avoided having to prop open the lid.
For more on vermicomposting:
Gayla-
what are the approximate dimensions of your smaller bin? I’m trying to get one started, but if I keep it outside, I’ll have the problem not just of cold in the winter, but heat in the summer. I don’t have a basement, so I’m trying to work out a place inside – where space is always a consideration – like you said, underfoot.
Toss them a few slices of moldy bread for me! mine love them and will roll up under the slices like kids in a sleeping bag.
But doesn’t it smell if brought indoors? though I suppose you have to, with canadian winters. I’d just buy more in spring, but it makes sense to keep your compost going all winter if you have trouble with the cold.
Mary: The new bin is about 16″ by 12.5″. Summer heat is a also a problem. I keep mine in a spot without direct sun or any surrounding materials that absorb heat. Indoors are the easiest for regulating temperature.
Victoria: It doesn’t smell. Food scraps are buried, I am careful about air circulation, and I don’t add more than the worm population can handle on a daily basis.
Thanks for the info, Gayla. Hopefully, it won’t be long before I, too, am vermicomposting (for some reason I just like that word).
Hi Gayla-
Thanks for the post. I kind of (definitely) needed a kick in the rear to get my bin cleaned up for the winter. I have a space for it outdoors in the spring/fall/summer when it isn’t so hot that my worms will cook- but this fall I just dragged it in and ignored it. My worms need new bedding and my plants need the compost- I just haven’t done it yet. I think today is the day:)
thank you for this post and the measurements. I need to downsize my big tub, and this info is perfect!
I moved my bin inside when it started to get cold. I also didn’t want it making a mess on my carpet (it sits in my office) so I invested in a new tupperware tub. I cut some large holes in the top and covered them with fine screen. With your setup (and all the holes) don’t you find that you get crazy numbers of fruit flies and gnats?
Well, that’s not too big at all! We’ve been kicking around the idea of starting a bin, maybe this will encourage us to go ahead. I’ve already decided I’ll call them The Galloping Herd.
An idea for people having trouble with fruit flies… I have had a worm bin for just over 6 months (doing well!) and I actually don’t have a real ‘lid’… and zero fruit flies!
I was paranoid about fruit flies, since my bin is in an office, so I folded over a large piece of remay (row cover) which is a poly-fabric used for organic growing that keeps bugs off plants… I placed this over the top of my tub, used a big elastic to hold the sides down firmly, and then covered the whole bin with pieces of old coffee sac. This way, the whole top is open for good ventilation, but the fabric is too fine for any fruit flies to get in.
We also collect the worm food in the (unused) office freezer on our fridge (thanks to a good tip from a friend!) which cuts down on fruit flies in the food scraps.
Caro: That is a very smart idea.
Jason: I haven’t had a fruit fly problem. Part of the trick is keeping the food buried. And good air flow.
Jody in PA: I love that you are going to name them. I think of mine with affection, like pets, so maybe I should name mine too…
Forgive the dumb question, but is there any smell associated with this?
Jessica: Not a dumb question. There shouldn’t be a smell if everything is balanced out well. But there can be if there is more than the worms can compost quickly or if there is too much moisture or poor air circulation in the bin.
We live in New Zealand, and our climate is temperate. Our worm bin is outside under the lemon tree, protected from winter frost and summer sun. (we do put old carpet over it in mid winter). Its the start of summer here, and our first year feeding our backyard veggie garden worm weez. What ever did we do with out it? It truly is gardeners gold!
Happy gardening with your worm bins!
Catherine: Yes! It’s such great stuff. And it isn’t heavy like regular compost so particularly good for pots.