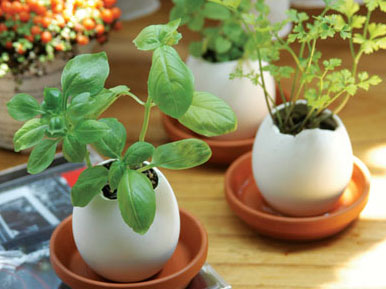
The Eggling Experience: Update 1

Germination has taken place in both the Eggling and the Real Egg. The Real Egg showed a few sprouts about 6 hours before the Eggling.

Sorry about the lack of photo to accompany this update however both seedlings are microscopic in size and I don’t have a macro lens.

I’m glad I saved a few seeds because I’m predicting that my reluctance (re: abject laziness) to go out and purchase sterile soil is going to bite me in the ass — damping off style. I applied a light sprinkle of cinnamon powder to the soil surface as a precaution but that soil was stolen from a container holding a large stevia plant that had been outside all summer long. In conclusion, damping off is inevitable. The thyme seedlings will meet a premature death. This experiment is utterly lacking in scientific method. I suck.

Leave a comment

Eggling versus Real Egg: Fight

eggling1.jpg

While setting up my “Eggling Experience” I thought it would fall more into the spirit of the much loved but long forgotten “The Lab” section of this site if I were to make this into an Eggling versus Real Egg experiment. I made the claim in my introductory post that an Eggling could be closely approximated for free using the shell of a real egg, and so I present to you a wholly unscientific experiment in which I will attempt to back that claim up with anecdotal evidence.

I haven’t done this since high school so bear with me.

Hypothesis:

A real egg is just as effective as an Eggling ceramic egg when used as a vessel for growing thyme from seed.

Method:

      1. Set up an Eggling according to the supplied directions.*

eggling2.jpg

      2. Hard boil a large chicken egg. You can use a raw egg and just plop out the contents but I felt like eating a boiled egg.
      3. Peel off a section from the top and scoop out the contents.
      4. Remove a section from the bottom so that the egg sits flat.
      5. Cut a small square of coffee filter and place in the bottom of the egg to cover the hole. This will keep the dirt from falling out.
      6. Fill the egg with sterile seed-starting mix and a dash of vermicompost (aka worm poo). I was out of potting soil and too involved in the scientific process to go out for some, so I cheated and used soil from another pot. The soil wasn’t sterile but… I added worm castings in an attempt to approximate the Eggling growing medium which is said (in the instructions) to include, “…enough nutrients for plants to grow in it for up to 5 months.”
      7. Sprinkle seeds on top of the soil. I used the extra seeds that came with the Eggling kit in an attempt to keep the projects as similar as possible (okay maybe no “as possible.” More like, as possible as I can be bothered without making a special trip to the store for additional supplies).

eggling5.jpg

      8. Water the egg slowly until water begins to drain into the tray from the bottom. I followed the directions outlined by the Eggling so that they followed the same routine.
      9. Place both Eggling and Real Egg in a warm place to germinate. Mine are sat on top of the television awaiting germination.

eggling7.jpg
*The supplied directions were seriously lacking in direction. When setting this up I tried to think like a beginner and I will say that as a fake beginner the lack of instructions left me feeling anxious as to whether I was doing the right thing. Did I make the hole big enough? How long will it take to germinate? How do I care for the plant once it has germinated? How do I prune? How do I transplant it? What happens next? p.s. In step #4 of the instruction pamphlet it is suggested that you shatter the Eggling and add the pieces to the soil of the transplanted plant “as fertilizer.” Dudes, last time I checked ceramic did not qualify as “fertilizer.”

p.s. NaBloPoMo is HARD.

Leave a comment

Mutant Veggies at the Fall Fair

A friend and I attended The Royal, Toronto’s big city attempt at a country fall fair. I was unable to make it over the last few years and forgot how good it is. Fall fairs are like cultural anthropology that happens close to home. There’s just something wholesome, quaint, and yet slightly off about neatly displayed jars of preserves, big piles of prize-winning sheared wool, and butter sculptures. I love it!

We went straight for my favorite part: the mutant veggies. I’ve really gotta try my hand at growing an out-of-control turnip or carrot one of these days. I’m too hung up on results-based gardening — turning out produce that is actually edible. I’m missing out on the time-honored tradition of making stuff HUGE just for the hell of it!

mutant2.jpg

    We concluded that it had to be a beet. Possibly a ‘Golden Beet.’

mutant1.jpg

    I’m disappointed in the lack of grotesqueness of this first place prize-winning potato. It’s too cute to be a prize-winning mutant. Reminds me of a baby seal.

mutant3.jpg

    No amount of roasting or Cuisinart trickery can transform this wooden zucchini into something edible. I suggest burning for warmth.

mutant4.jpg

    Octopods

mutant5.jpg

    The tag says, “8th Place for Most Unusually Shaped Vegetable.” Help.
Leave a comment

Container Garden Clean-up

Today was a dry and mild reprieve from the awful cold, wet and sometimes windy late fall weather we’ve been enduring here in Southern Ontario — a good day to do some garden work. I have found frozen water in the trays underneath the containers on the roof a couple of times recently increasing my concern about getting everything cleaned up in time. You can pretty much forego cleaning up in-ground gardens (I know because I have) and expect minor plant loss, however container gardens in these parts can’t be ignored. The heaving caused by freezing and thawing conditions will crack and destroy terra cotta and some plastic containers. I’ve got A LOT of containers out there and would like to keep the collection I’ve cobbled together for as long as possible.

Here’s what I do to clean-up the container garden:

  • Bring houseplants and plants that are still producing fruit indoors – I did this back in September well before the first frost.
  • Harvest remaining produce – I found a couple of missed tomatoes, sweet potatoes, hot peppers, and a few small red onions.
  • Remove all plant matter from terracotta and small containers – Cut them into manageable pieces and compost. If you don’t have a composter put them into garden waste bags for city composting.
  • Remove stakes from containers and pile together.
  • Dump soil from pots that will be stored away – I dump all of my soil into the large, plastic garbage cans that are used for growing tomatoes. They stay outside for the winter.
  • Hardy perennials can be safely overwintered in large planter boxes – I sometimes add a blanket of mulch or dried branches, but they do just fine regardless. You can prune them back if breakage is an issue, but the plants in my boxes are so tough I leave the stems for added interest. The birds like to perch on the branches on mild winter days searching for seeds to munch on. They also collect dried grass bits for their nests come spring.
  • Soak and scrub all terracotta pots and containers that are too fragile for outdoor storage – I wash mine in hot soapy water to which I add a couple of splashes of oxygenated bleach (aka hydrogen peroxide).
  • Over-turn, stack, and store your pots somewhere sheltered such as a garage, basement, or shed. I don’t have any of those so I stack mine on shelves in our hallway and tuck the treasured containers away in the back of kitchen cupboards.

Related: Preparing Your Garden for Winter

Leave a comment

Recycled Garden + Contest

I’ve started a new contest on the site. The prizes are copies of Tsia Carson’s book, “Craftivity.” I tend to make contests that are simple to enter but thought it would be fun to do one that is more interactive. I love to see the inventive things you are doing in your gardens. I also think it’s important in a gardening media that is saturated with images of pricey, hyper-perfect gardens to get as many images of gardens by you and me out into the world as possible. Your little pot of basil set on the stoop is just as valid as anything seen in the glossy pages of a magazine.

So in the spirit of Tsia’s book I thought it would be inspiring to see how you are making use of former tin cans, plastic bottles, and other items from the roadside economy in your gardening practice. And to get the ball rolling I’ve tagged a bunch of my own images on Flickr so you can see that we’re not looking for over-the-top submissions here (although those are great) but simple and creative solutions to recycling and reusing.

Visit the contest page for more details and submission details.

Leave a comment